
Google Security Operations SIEM Installation Guide
This integration enables the seamless ingestion, parsing, and visualization of GreyNoise threat intelligence Indicator data within Google SecOps SIEM, offering comprehensive insights through native Google SecOps dashboards. It supports real-time delivery of indicators from GreyNoise's threat intelligence platform, automatically enriching security events with contextual threat data.
App Installation & Configuration
Pre-Requisites
- Google SecOps Instance
- GreyNoise Intelligence platform (API Key).
- GCP Project with the below required permissions:
- GCP user and project service account should have the following permissions. Follow these steps to assign these permissions to the service account used for accessing other GCP services within your project.
- Cloud Scheduler Job Runner
- Secret Manager Secret Access
- Storage Admin
- Chronicle API Editor
- Role Viewer
- Cloud Run Invoker
- GCP user and project service account should have the following permissions. Follow these steps to assign these permissions to the service account used for accessing other GCP services within your project.
- GCP Services
- Before using the services below, ensure the Google APIs are enabled in your GCP project
- Cloud Run Function (4-core CPU or higher is recommended)
- GCS bucket
- Secret Manager
- Cloud Scheduler
- Before using the services below, ensure the Google APIs are enabled in your GCP project
- Access to Google SecOps Rules & Detection section.
- Access to Google SecOps Dashboard section.
Compatibility Matrix
| Component | Version/ Value |
|---|---|
| GreyNoise SDK Version | 3.0.1 |
| Cloud Functions | 2nd Gen (Cloud Run) |
| Runtime Python version in Cloud Run Function | Python 3.12 |
| Google SecOps API version | v2 |
Creating a zip of the cloud function
- Create a zip file with the contents of the following files:
- Download the common directory from Git repository.
- Download the contents of the GreyNoise ingestion script.
- Create a zip in the following structure.
-
Example:
├── README.md
├── common
│   ├── **init**.py
│   ├── auth.py
│   ├── auth\_test.py
│   ├── env\_constants.py
│   ├── ingest.py
│   ├── ingest\_test.py
│   ├── ingest\_v1.py
│   ├── ingest\_v1\_test.py
│   ├── status.py
│   ├── utils.py
│   └── utils\_test.py
├── constant.py
├── exception\_handler.py
├── main.py
├── main\_test.py
├── requirements.txt
├── utility.py
├── utility\_test.py
├── greynoise\_client.py
└── greynoise\_client\_test.py
Automatic deployment of the required resources
This section explains the use of the provided bash script to automate the deployment of the GreyNoise Intelligence ingestion function and related resources within your GCP project.
Prerequisites For Script Execution :
-
Access to a GCP project with sufficient permissions to enable APIs, create service accounts, IAM bindings, GCS buckets, Cloud Functions, Cloud Scheduler jobs, and Secret Manager secrets.
-
The Cloud Function source code packaged as a ZIP file in this format, available on your local machine or accessible within the Cloud Shell environment.
Execution Steps :
1. Open Google Cloud Shell
-
Navigate to the Google Cloud Console (console.cloud.google.com).
-
Click the "Activate Cloud Shell" in the upper right corner of the console. A terminal window will open within your browser.
2. Create the Script File
-
Choose a name for the script, for example,
greynoise_deploy.sh -
Use a text editor like
nanoto create the file in your Cloud Shell home directory:nano greynoise_deploy.sh
3. Paste the Script Content
-
Copy the entire content of the bash script provided from the GitHub repo.
-
Paste the script content into the
nanoeditor. In Cloud Shell, you can typically right-click and select "Paste" or useCtrl+Shift+V.
4. Save and Exit
-
Press
Ctrl+Xto exitnano. -
When prompted to save, press Y.
-
Press
Enterto confirm the filename (greynoise_deploy.sh)
5. Upload Your Cloud Function ZIP (if not already in Cloud Shell)
-
If your function ZIP file is on your local machine, you need to upload it to Cloud Shell.
-
Click the three-dot menu in the Cloud Shell terminal window.
-
Select "Upload" and choose your ZIP file. It will be uploaded to your Cloud Shell home directory. Note the filename.
6. Make the Script Executable
- Grant execute permissions to the script file:
chmod +x greynoise_deploy.sh
7. Run the Deployment Script
- Execute the script:
./greynoise_deploy.sh
8. Follow the Prompts
-
The script will prompt you to enter various configuration details, These values can be obtained by following these steps. Add configuration values such as:
-
GCP Project ID & Region
-
Local path to your Cloud Function ZIP file (e.g.,
/home/username/your-function.zip) -
Chronicle Customer ID
-
Chronicle Region
-
GreyNoise API Key Value (this will be stored securely in Secret Manager)
-
Other optional environment variables.
-
-
Provide the requested information at each prompt. Required fields must be filled. Optional fields can be left blank to use the default value where applicable.
9. Monitor the Output
-
The script will display progress messages, indicating which steps are being performed (e.g., enabling APIs, creating resources, deploying the function).
-
Error messages will be shown in red. If an error occurs, the script is designed to stop. Review the error message to troubleshoot.
10. Post-Deployment
-
Once the script completes successfully, verify the resources in the GCP Console:
-
Check Cloud Functions to see your deployed function.
-
Check Cloud Scheduler to see the scheduled job.
-
Check Cloud Storage - bucket, which should have a code zip file with name greynoise_function.zip.
-
Check the Secret Manager for the GreyNoise API Key secret.
-
Review Cloud Logging for any function execution logs or errors.
-
Manual deployment of the required resources
Enabling required APIs
Ensure the following Google APIs are enabled in your GCP project (via APIs & Services → Library).
| Service | APIs that need to be enabled |
|---|---|
| Google SecOps | chronicle.googleapis.com |
| Cloud Functions | cloudfunctions.googleapis.com run.googleapis.com cloudbuild.googleapis.com artifactregistry.googleapis.com logging.googleapis.com |
| Cloud Scheduler | cloudscheduler.googleapis.com pubsub.googleapis.com |
| Cloud Storage (Bucket) | storage-component.googleapis.com |
| Secret Manager | secretmanager.googleapis.com |
| Cloud Resource Manager | cloudresourcemanager.googleapis.com |
Using Secrets
-
Environment variables marked as secret must be configured as secrets on Google Secret Manager. [REF]
-
Once the secrets are created on Secret Manager, use the secret's resource ID as the value for environment variables.
For example:
CHRONICLE_SERVICE_ACCOUNT: projects/{project_id}/secrets/{secret_id}/versions/{version_id}
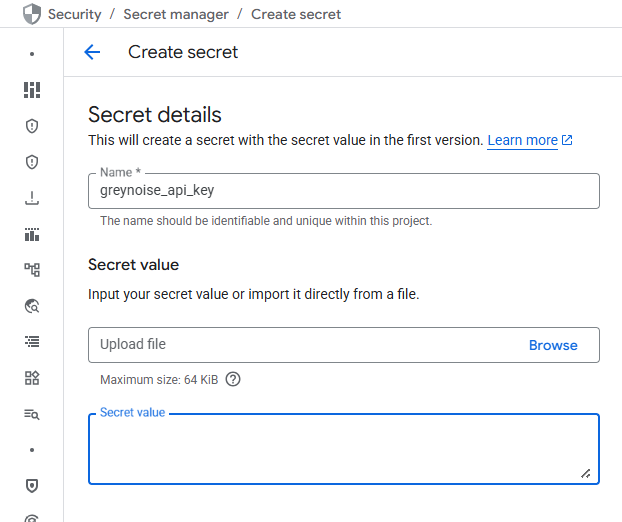
Add the GreyNoise API Key in Secret Manager
- Log in to the Google Cloud Console using valid credentials.
- Navigate to 'Secret Manager'.
- Click on 'Create Secret'.
- Provide the name for the secret in the
Namefield. - Provide the value for the secret in the
Secret Valuefield. - Keep the other configurations as default, and click on the 'Create Secret' button.
Refer to this page for more information about how to create secrets.
Once the secrets are created on Secret Manager, use the secret's resource ID as the value for environment variables. For example
SECRET_KEY: projects/{project_id}/secrets/{secret_id}/versions/{version_id}
Note: Ensure the resource ID follows the format: projects/{project_id}/secrets/{secret_id}/versions/{version_id}. You can copy the resource name from the secret version details to obtain this value.
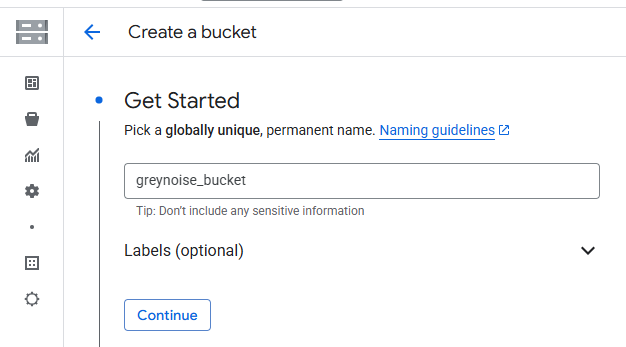
Create a GCP Bucket
-
Log in to the Google Cloud Console using valid credentials.
-
Navigate to Buckets in GCP.
-
Click on the Create button.
-
Enter the name of the bucket.
-
Users can select the region and, if required, modify optional parameters, then click the Create button.
Copy the bucket name and provide it in the GCP_BUCKET_NAME environment variable.
Cloud Function Deployment
Command-based deployment
-
Navigate to the bucket created for GreyNoise in these steps. Upload the created cloud function zip file to the bucket.
-
Click Activate Cloud Shell at the top right corner of the Google Cloud console.
-
Modify the command below based on your value and run it in the terminal.
Command Format :
gcloud functions deploy CLOUD_FUNCTION_NAME --set-env-vars "ENV_NAME1=ENV_VALUE1,ENV_NAME2=ENV_VALUE2,ENV_NAME3=ENV_VALUE3" --gen2 --runtime=python312 --region=REGION --source=SOURCE_OF_FUNCTION --entry-point=main --service-account=SERVICE_ACCOUNT_EMAIL --trigger-http --no-allow-unauthenticated --memory=8GiB --timeout=3600s- CLOUD_FUNCTION_NAME: Unique name of the cloud function.
- REGION: A region for your cloud function. (Ex : us-central1, us-west1, etc.)
- SOURCE_OF_FUNCTION: gsutil URI of the cloud function zip in cloud storage. (e.g. gs://greynoise_test_bucket/greynoise_test.zip) where the greynoise_test_bucket is the name of the created bucket and greynoise_test.zip is the cloud function zip file.
- SERVICE_ACCOUNT_EMAIL: Email of the created service account of the project. Make sure the selected Service account must have a required permission. Update Service Account Permission following these steps.
- ENV_NAME1=ENV_VALUE1: Name and value of the environment variable to be created. Environment variables
Note:
- When deploying a Cloud Function, ensure that the --timeout parameter in the deployment command matches the frequency specified in the Cloud Scheduler --schedule parameter. Aligning these values prevents overlapping executions, which could lead to data duplication.
- For example, if you set --timeout=3600s when deploying the Cloud Function, configure the Cloud Scheduler with: --schedule="/60 * * *".
- This ensures that each scheduled run starts only after the previous execution has completed.
Example Command,
gcloud functions deploy funcusingcmd --set-env-vars "CHRONICLE_CUSTOMER_ID=ed19f037-2354-43df-bfbf-350362b45844,CHRONICLE_PROJECT_NUMBER=2134567,CHRONICLE_REGION=us,GCP_BUCKET_NAME=greynoise_test_bucket,GREYNOISE_API_KEY=projects/1234567890/secrets/gn_api_key/versions/1," --gen2 --runtime=python312 --region=us-central1 --source=gs://gn_test_bucket/greynoise_test.zip --entry-point=main --service-account=1234567890-compute@developer.gserviceaccount.com --trigger-http --no-allow-unauthenticated --memory=8GiB --timeout=3600sConfigure Scheduler
Command-based deployment
- Click Activate Cloud Shell at the top right corner of the Google Cloud console.
- Modify the command below based on your value and run it in the terminal.
Command Format :
gcloud scheduler jobs create http SCHEDULER_NAME --schedule="CRON_TIME" --uri="CLOUD_FUNCTION_URL" --http-method=POST --attempt-deadline=30m --oidc-service-account-email=SERVICE_ACCOUNT_EMAIL --location=LOCATION --time-zone=TIME_ZONE --project=CHRONICLE_PROJECT_NUMBER-
SCHEDULER_NAME: Unique name of the cloud scheduler.
-
CRON_TIME: Cron time format for the scheduler to run in every interval. (eg. /60 * * *)
-
CLOUD_FUNCTION_URL: URL of the created cloud function. Navigate to create cloud function details.
-
SERVICE_ACCOUNT_EMAIL: Email of the created service account of the project. Make sure the selected Service account must have a required Permission. Update Service Account Permission following these steps.
-
LOCATION: A region for your connector. (Ex: us-central1, us-west1, etc)
-
TIME_ZONE: The time zone of your region. (Ex: UTC)
Note:
- When deploying a Cloud Function, ensure that the --timeout parameter in the deployment command matches the frequency specified in the Cloud Scheduler --schedule parameter. Aligning these values prevents overlapping executions, which could lead to data duplication.
-
For example, if you set --timeout=3600s when deploying the Cloud Function, configure the Cloud Scheduler with: --schedule="/60 * * *".
-
This ensures that each scheduled run starts only after the previous execution has completed.
Example Command
gcloud scheduler jobs create http funcusingcmdschedular --schedule="*/60 * * * *" --uri="https://us-central1-test.cloudfunctions.net/funcusingcmd" --attempt-deadline=30m --oidc-service-account-email=1234567890-compute@developer.gserviceaccount.com --location=us-central1 --time-zone=UTCUpdate Service Account Permission
- Open GCP Console, then go to IAM.
- In View By Main Tab > Click GRANT ACCESS.
- Add the Service Account name in New Principals. (Example: service_account_name.gserviceaccount.com)
- In Assign Role, assign below roles to service accounts.
- Cloud Scheduler Job Runner
- Secret Manager Secret Access
- Storage Admin
- Chronicle API Editor
- Cloud Run Invoker
- Role Viewer
- Click Save.
Environment Variables to be configured in Cloud Function
During integration setup, users must provide environment-specific values. These values can be obtained by following these steps.
| Environment variable | Description | Default value | Required | Secret Manager |
|---|---|---|---|---|
| CHRONICLE_CUSTOMER_ID | Google SecOps customer ID. Navigate to settings in the Google SecOps console for the customer ID. | - | Yes | No |
| CHRONICLE_REGION | A region where the Google SecOps instance is located. | us | No | No |
| CHRONICLE_PROJECT_NUMBER | Specifies the GCP project identifier associated with your Google SecOps environment. | - | Yes | No |
| GCP_BUCKET_NAME | Name of the created GCP bucket. | - | Yes | No |
| GREYNOISE_API_KEY | Copied resource name value of API KEY of GreyNoise from secret manager. Generate an API Key from the GreyNoise platform's API key section. | - | Yes | Yes |
| QUERY | A query to filter GreyNoise Indicators. More details. Examples are below: actor:Censys classification:benign | last_seen:1d | No | No |
Live Investigation
Use Live Investigation to pull GreyNoise intelligence on demand - for a specific set of IPs or a GNQL query - without waiting for the scheduled ingest job to run. Results are fetched via the GreyNoise Cloud Function and ingested directly into Google SecOps.
Option 1: Investigate a Set of IPs from a Datatable
Use this option when you have a specific set of IPs stored in a Google SecOps datatable that you want to investigate immediately.
Before You Begin
Create or update a Google SecOps datatable containing the IPs to investigate. The live investigation pulls IPs directly from this table. To build or update the table, follow the steps here. Invalid IPs in the table are automatically ignored.
Steps:
-
Open the deployed GreyNoise Cloud Function in the Google Cloud Console and click Test.
-
In Configure Payload, enter the following payload, replacing the placeholder with your datatable name:
{"datatable_name": "<name of datatable>"}
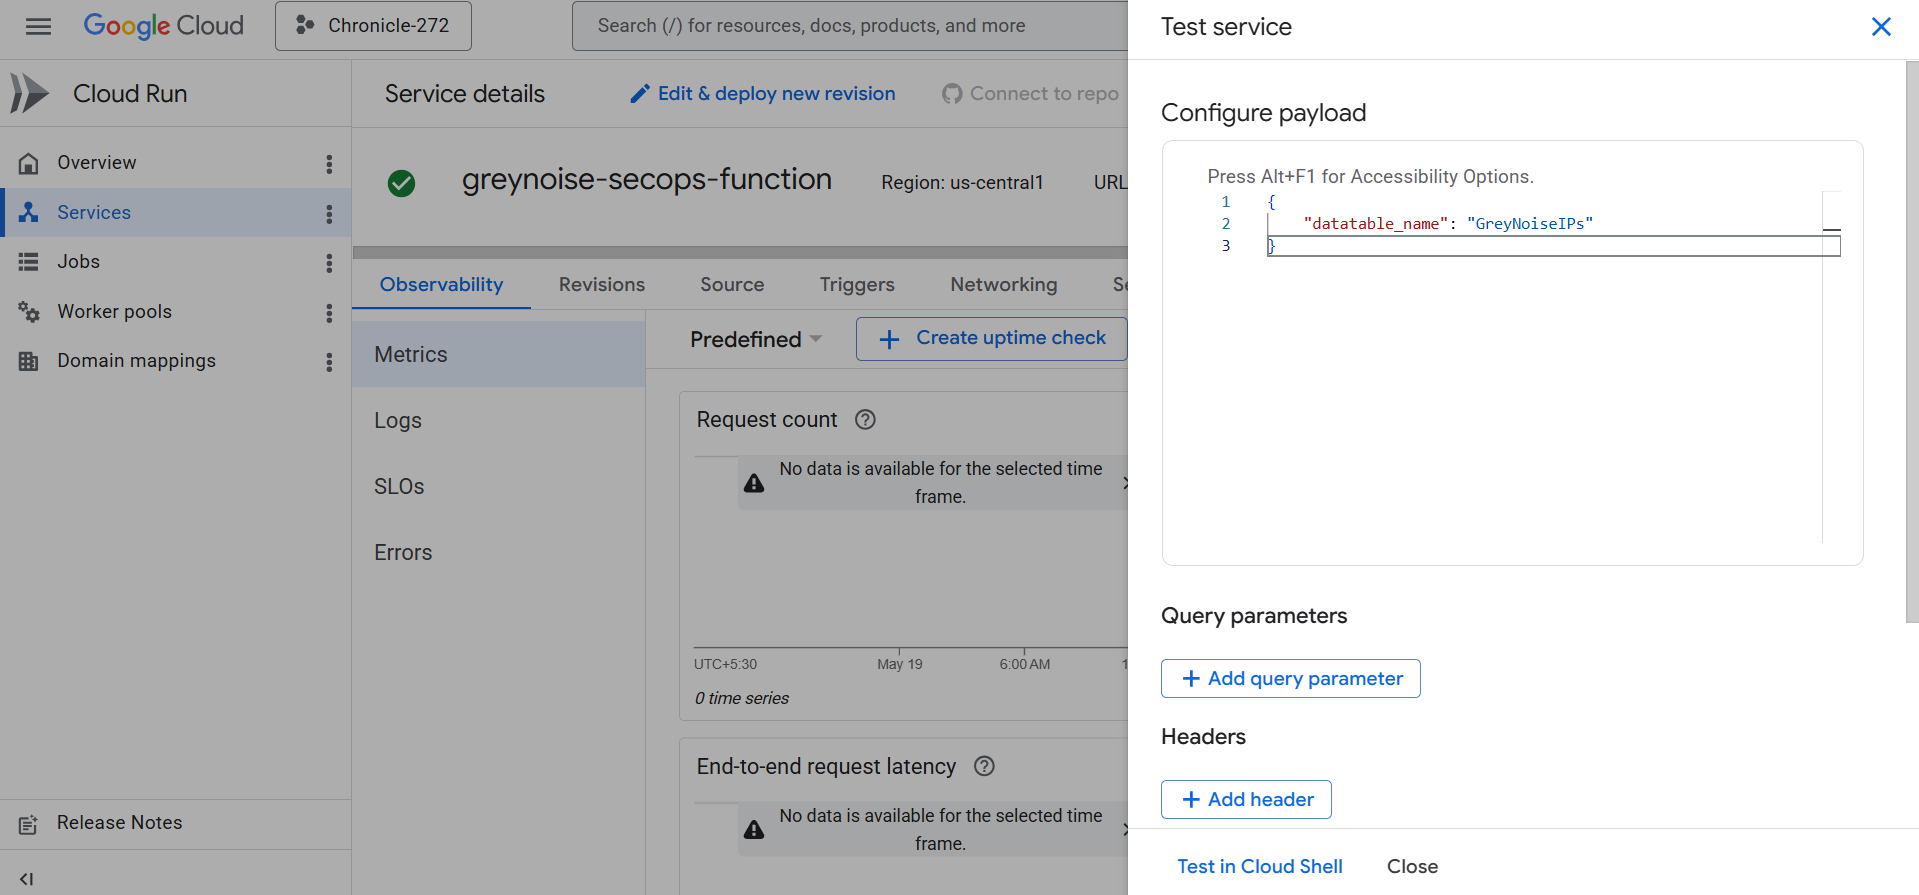
- Click Test in Cloud Shell. When the terminal opens, press Enter to begin the run.
- The ad-hoc Python script fetches GreyNoise intelligence for each valid IP in the table and ingests the resulting entities into Google SecOps.
- Track progress in the Cloud Function Logs tab.
- To view investigated and ingested IPs in Google SecOps, follow these steps.
Option 2: Investigate IPs Matching a GNQL Query
Use this option when you want to investigate IPs that match specific GreyNoise criteria, without a predefined datatable.
Steps:
-
Open the deployed GreyNoise Cloud Function in the Google Cloud Console and click Test.
-
In Configure Payload, enter the following payload, replacing the placeholder with your GNQL query:
{"query": "<query for investigation>"}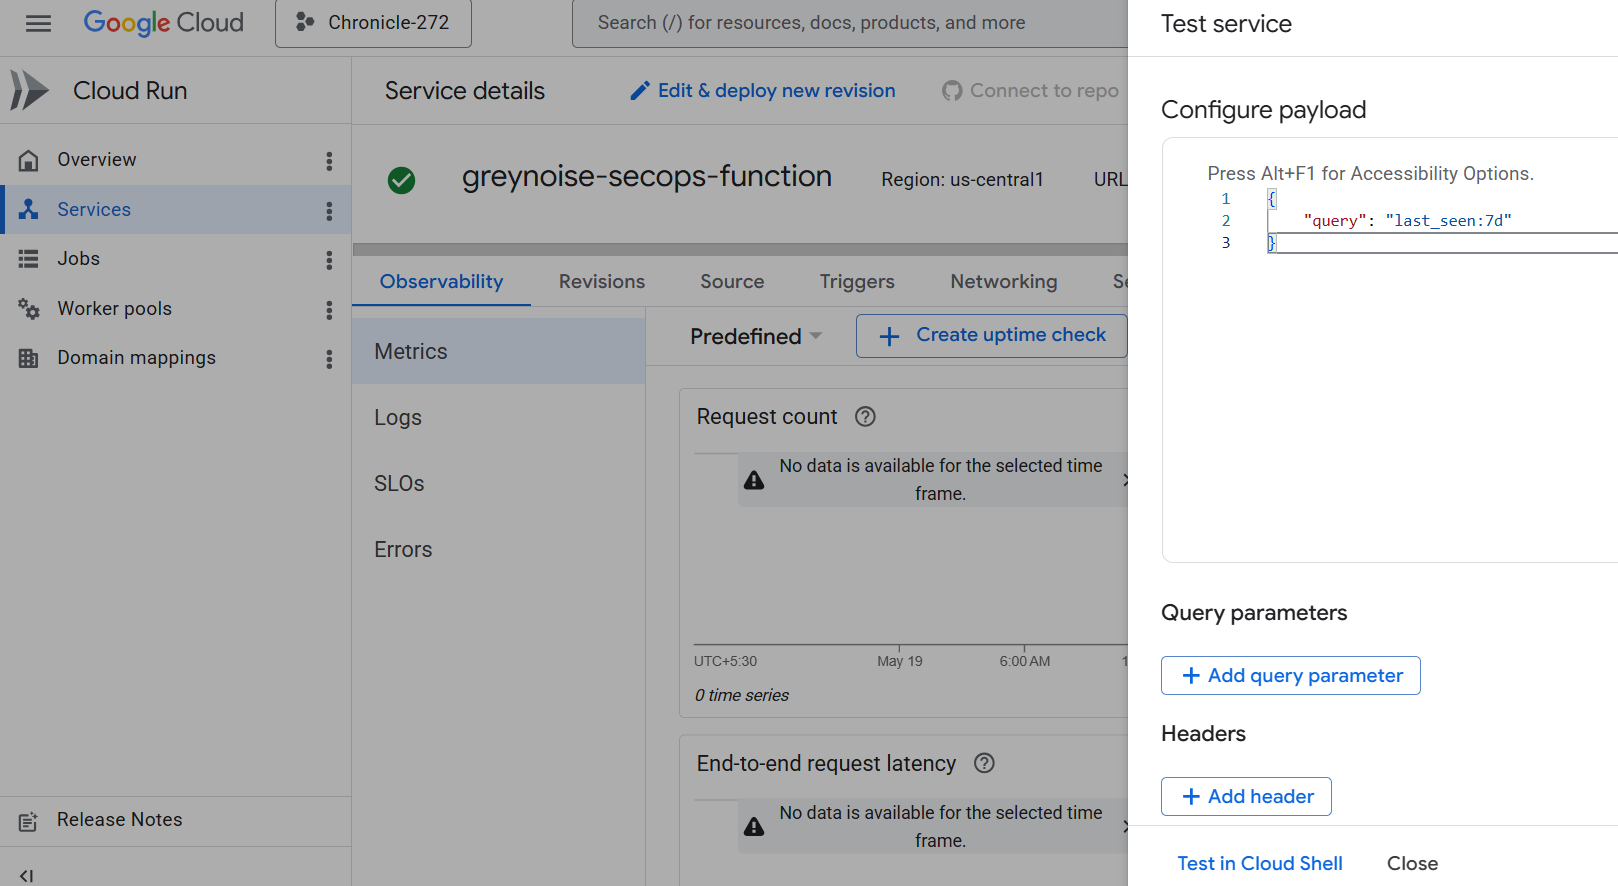
Note: If you do not specify a last_seen filter in your query, it automatically scopes to last_seen:1d. To override this, include your own last_seen:{x}d value in the query.
-
Click Test in Cloud Shell. When the terminal opens, press Enter to begin the run.
-
The script fetches GreyNoise intelligence for all IPs matching the query and ingests the resulting entities into Google SecOps.
-
Track progress in the Cloud Function Logs tab.
-
To view investigated and ingested IPs in Google SecOps, follow these steps.
Combining Both Inputs
You can provide both a datatable_name and a query in the same payload. When combined, the query runs against every valid IP returned from the datatable.
{
  "query": "<query for investigation>",
  "datatable_name": "<name of datatable>"
}
Note: Leaving both datatable_name and query empty will cause the script to exit with an error.
View Entities in Google SecOps
- Log in to Google SecOps:
- Open a web browser and navigate to the Google SecOps instance URL. For example: https://test.backstory.chronicle.security/
- Replace test with your actual Google SecOps instance name.
- Access SIEM Search:
- From the top left corner of the Google SecOps console, select the "Investigation" option.
- Within the Investigation section, choose "SIEM Search".
- Filter Entities by Log Type:
- In the SIEM Search interface, locate the "UDM Search" section.
- Apply a filter for the field "log_types". Set the filter value to graph.metadata.event_metadata.base_labels.log_types = "GREYNOISE"
- View GreyNoise Intelligence Entities:
- The SIEM Search results will display GreyNoise Intelligence entities within the "Results" section.
Redeploying an Upgraded Build
Run the same Automatic or Manual steps with the new Cloud Function ZIP. Use the same function name so GCP can automatically update the code.
Deployment Steps:
Automatic: Rerun the bash script to provide the updated ZIP, and reuse the earlier configuration values (Project ID, API key, etc.).
Manual: Rerun the gcloud functions deploy command, point the source flag to the latest ZIP, and keep the function name unchanged.
Important Notes:
- The same function name means the old build is overwritten; no extra cleanup is required.
- Cloud Scheduler, Secret Manager, and service account settings remain valid.
- After redeploying, check Cloud Logging to confirm everything runs without errors.
Detection Rules
Create Detection Rules
After collecting the data into Google SecOps as entities, the user can view specific entities from predefined saved searches.
Create & Enable Detection Rule
Repeat the following steps for each of the desired Detection Rules listed in the next section:
- From Google SecOps SIEM, navigate to Detection > Rules & Detections.
- Go to the Rules Editor Tab**,** click on the NEW ** button.**
- Copy and paste the Rule in the editor.
- Click on SAVE NEW RULE.
- Click on the 3 dots on the top right of the editor.
- To generate alerts, enable Alerting
- Enable Live Rule to activate the Detection Rule**.**
See Google SecOps: Detection Rules for more information.
Detection Rules
1. GreyNoise Intelligence Brute Force Attack Detection
Description: Detects multiple blocked login attempts from IPs flagged by GreyNoise threat intelligence.
Rule:
rule greynoise_intelligence_brute_force_attack_detection {

  meta:
    author = "GreyNoise Intelligence"
    rule_name = "GreyNoise Intelligence Brute Force Attack Detection"
    description = "Detects multiple blocked login attempts from IPs flagged by GreyNoise threat intelligence."
    severity = "High"
    priority = "High"
    mitre_attack_tactic = "Credential Access"
    mitre_attack_technique = "T1110 - Brute Force"
    tags = "cloud security, threat intelligence"

  events:
    $login.metadata.event_type = "USER_LOGIN"
    $login.security_result.action = "BLOCK"
    (
        $login.src.ip = $correlation_ip or
        $login.principal.ip = $correlation_ip
    )

    // GreyNoise entity match
    $greynoise.graph.metadata.event_metadata.base_labels.log_types = "GREYNOISE"
    $greynoise.graph.metadata.product_name = "GreyNoise Intelligence"
    $greynoise.graph.metadata.entity_type = "IP_ADDRESS"
    $greynoise.graph.entity.ip = $correlation_ip

  match:
    $correlation_ip over 15m

  outcome:
    $principal_ip = array_distinct($login.principal.ip)
    $principal_hostname = array_distinct($login.principal.hostname)
    $principal_user_userid = array_distinct($login.principal.user.userid)
    $principal_mac = array_distinct($login.principal.mac)
    $principal_ip_count = count($login.principal.ip)

    $source_ip = array_distinct($login.src.ip)
    $source_hostname = array_distinct($login.src.hostname)
    $source_user_userid = array_distinct($login.src.user.userid)
    $source_mac = array_distinct($login.src.mac)
    $source_ip_count = count($login.src.ip)

    $target_ip = array_distinct($login.target.ip)
    $target_hostname = array_distinct($login.target.hostname)
    $target_user_userid = array_distinct($login.target.user.userid)
    $target_mac = array_distinct($login.target.mac)

  condition:
    $login and $greynoise and ($principal_ip_count>5 or $source_ip_count>5)
}
2. GreyNoise Intelligence Inbound Network Traffic with ASN Context
Description: Detects allowed inbound firewall connections from malicious IPs flagged by GreyNoise with correlated ASN context.
Rule:
rule greynoise_intelligence_inbound_network_traffic_with_asn_context {

  meta:
    author = "GreyNoise Intelligence"
    rule_name = "GreyNoise Intelligence Inbound Network Traffic with ASN Context"
    description = "Detects allowed inbound firewall connections from malicious IPs flagged by GreyNoise with correlated ASN context."
    severity = "High"
    priority = "Critical"
    mitre_attack_tactic = "Initial Access"
    tags = "cloud security, threat intelligence"

  events:
    $network.metadata.event_type = "NETWORK_CONNECTION"
    $network.security_result.action = "ALLOW"
    re.regex($network.metadata.product_name, `(?i).*firewall.*`)
    (
        $network.src.ip = $correlation_ip or
        $network.principal.ip = $correlation_ip
    )

    // GreyNoise entity match
    $greynoise.graph.metadata.event_metadata.base_labels.log_types = "GREYNOISE"
    $greynoise.graph.metadata.product_name = "GreyNoise Intelligence"
    $greynoise.graph.metadata.entity_type = "IP_ADDRESS"
    $greynoise.graph.metadata.threat.threat_verdict = "MALICIOUS"
    $greynoise.graph.entity.ip = $correlation_ip
    (
        re.capture($network.principal.ip_geo_artifact.network.asn, `(\d+)`) = re.capture($greynoise.graph.entity.ip_geo_artifact.network.asn, `(\d+)`)
        or
        re.capture($network.src.ip_geo_artifact.network.asn, `(\d+)`) = re.capture($greynoise.graph.entity.ip_geo_artifact.network.asn, `(\d+)`)
    )

  match:
    $correlation_ip over 1h

  outcome:
    $principal_ip = array_distinct($network.principal.ip)
    $principal_hostname = array_distinct($network.principal.hostname)
    $principal_user_userid = array_distinct($network.principal.user.userid)
    $principal_mac = array_distinct($network.principal.mac)

    $source_ip = array_distinct($network.src.ip)
    $source_hostname = array_distinct($network.src.hostname)
    $source_user_userid = array_distinct($network.src.user.userid)
    $source_mac = array_distinct($network.src.mac)

    $target_ip = array_distinct($network.target.ip)
    $target_hostname = array_distinct($network.target.hostname)
    $target_user_userid = array_distinct($network.target.user.userid)
    $target_mac = array_distinct($network.target.mac)

  condition:
    $network and $greynoise
}
3. GreyNoise Intelligence IP Match
Description: Detects events where the source or principal IP matches a malicious or suspicious IP in GreyNoise intelligence.
rule greynoise_intelligence_ip_match {

  meta:
    author = "GreyNoise Intelligence"
    rule_name = "GreyNoise Intelligence IP Match"
    description = "Detects events where source or principal IP matches a malicious or suspicious IP in GreyNoise intelligence."
    severity = "High"
    priority = "Medium"
    tags = "cloud security, threat intelligence"

  events:
    $network.metadata.event_type != "GENERIC_EVENT"
    (
        $network.src.ip = $correlation_ip or
        $network.principal.ip = $correlation_ip
    )

    // GreyNoise entity match
    $greynoise.graph.metadata.event_metadata.base_labels.log_types = "GREYNOISE"
    $greynoise.graph.metadata.product_name = "GreyNoise Intelligence"
    $greynoise.graph.metadata.entity_type = "IP_ADDRESS"
    (
        $greynoise.graph.metadata.threat.threat_verdict = "MALICIOUS"
        or
        $greynoise.graph.metadata.threat.threat_verdict = "SUSPICIOUS"
    )
    $greynoise.graph.entity.ip = $correlation_ip

  match:
    $correlation_ip over 1h

  outcome:
    $principal_ip = array_distinct($network.principal.ip)
    $principal_hostname = array_distinct($network.principal.hostname)
    $principal_user_userid = array_distinct($network.principal.user.userid)
    $principal_mac = array_distinct($network.principal.mac)

    $source_ip = array_distinct($network.src.ip)
    $source_hostname = array_distinct($network.src.hostname)
    $source_user_userid = array_distinct($network.src.user.userid)
    $source_mac = array_distinct($network.src.mac)

    $target_ip = array_distinct($network.target.ip)
    $target_hostname = array_distinct($network.target.hostname)
    $target_user_userid = array_distinct($network.target.user.userid)
    $target_mac = array_distinct($network.target.mac)

  condition:
    $network and $greynoise
}
Saved Searches
Create Saved Searches
After collecting the data into Google SecOps as entities, the user can view specific entities from predefined saved searches.
Create & Execute a Saved Search
Repeat the following steps for each of the desired Saved Searches listed in the next section:
- From Google SecOps SIEM, navigate to Investigation > SIEM Search.
- Go to Search Manager and click the + icon**.**
- Copy and paste the Search Query in UDM SEARCH, Title in Title, and Description in Description from the Search Queries listed below.
- Click on SAVE EDITS.
- Click on LOAD SEARCH.
- Select Time Range.
- Click on Run Search to execute the search query.
See Google SecOps: Saved Searches for more information.
Saved Searches
1. GreyNoise - IP Risk & Vulnerability Details
Description: Comprehensive security view of GreyNoise indicators, including classification, anonymization signals, associated CVEs, and activity timeline.
Query:
graph.metadata.vendor_name = "GreyNoise Intelligence"
graph.metadata.product_name = "GreyNoise Intelligence"
$ip = graph.entity.ip
$classification = graph.metadata.threat.threat_verdict
$bot = strings.to_upper(graph.metadata.threat.detection_fields["bot"])
$tor = strings.to_upper(graph.metadata.threat.detection_fields["tor"])
$spoofable = strings.to_upper(graph.metadata.threat.detection_fields["spoofable"])
$vpn_Service = if(graph.metadata.threat.detection_fields["vpn"]= "true", graph.metadata.threat.detection_fields["vpn_service"], "-")
$time = timestamp.get_timestamp(graph.metadata.collected_timestamp.seconds, "%Y-%m-%d %H:%M:%S")
$first_seen_date = timestamp.get_timestamp(graph.metadata.threat.first_discovered_time.seconds, "%Y-%m-%d")
$category = graph.additional.fields["network_category"]
$category = /.*/
graph.entity.asset.vulnerabilities.cve_id = /.*/
match:
    $ip, $classification, $category, $bot, $tor, $vpn_Service, $spoofable, $first_seen_date
outcome:
    $all_cves = re.replace((arrays.join_string(array_distinct(if(graph.entity.asset.vulnerabilities.cve_id!="", graph.entity.asset.vulnerabilities.cve_id, "-")),", ")), "(, -)|(-, )","")
    $last_seen = window.last(graph.metadata.collected_timestamp.seconds, $time)
order:
    $last_seen desc
limit:
    10000
2. GreyNoise - Indicator Context Summary
Description: Provides actor attribution, geographic details, organization info, and tags for quick indicator triage and contextual analysis.
Query:
graph.metadata.vendor_name = "GreyNoise Intelligence"
graph.metadata.product_name = "GreyNoise Intelligence"
$ip = graph.entity.ip
$classification = graph.metadata.threat.threat_verdict
$actor = graph.additional.fields["internet_scanner_actor"]
$country = graph.entity.ip_geo_artifact.location.country_or_region
$organization = graph.entity.ip_geo_artifact.network.organization_name
$category = graph.additional.fields["network_category"]
$description = graph.metadata.description
$summary = graph.metadata.threat.summary
$time = timestamp.get_timestamp(graph.metadata.collected_timestamp.seconds, "%Y-%m-%d %H:%M:%S")
$first_seen_date = timestamp.get_timestamp(graph.metadata.threat.first_discovered_time.seconds, "%Y-%m-%d")
match:
    $ip, $classification, $description, $summary, $actor, $country, $organization, $category, $first_seen_date
outcome:
    $last_seen = window.last(graph.metadata.collected_timestamp.seconds, $time)
    $primary_tag = re.replace((arrays.join_string(array_distinct(if(graph.entity.artifact.tags!="", graph.entity.artifact.tags, "-")),", ")), "(, -)|(-, )","")
order:
    $last_seen desc
limit:
    10000
3. GreyNoise - High Risk Indicators
Description: Lookup filter to quickly identify indicators classified as MALICIOUS or SUSPICIOUS that require immediate investigation.
Query:
graph.metadata.product_name = "GreyNoise Intelligence"
graph.metadata.vendor_name = "GreyNoise Intelligence"
$classification = graph.metadata.threat.threat_verdict
$classification = "MALICIOUS" or $classification = "SUSPICIOUS"
4. GreyNoise - All Indicator Lookup
Description: Browse all ingested GreyNoise indicators with business service context. Use as a starting point for ad-hoc investigations.
Query:
graph.metadata.vendor_name = "GreyNoise Intelligence"
graph.metadata.product_name  = "GreyNoise Intelligence"
graph.entity.ip = /.*/
graph.additional.fields["business_service_found"] = /.*/ nocase
Dashboard Configuration
Import GreyNoise Dashboard into Google SecOps SIEM
Complete the following steps to import a dashboard:
-
Download the .json files of dashboards for GreyNoise Intelligence from the following github repository.
-
Log in to your Google SecOps instance.
-
In the navigation bar, click Dashboards & Reports > Dashboards.
-
Click New dashboard and then select Import from JSON. The Import dashboard confirmation dialog appears.
-
Click the Upload dashboard files button. The Select file dialog appears. Select the dashboard json file. The selected dashboard file will appear in the table.

-
Click Import to continue importing the dashboard to a personal or shared dashboard.
Dashboards
Indicator Dashboard
The Indicator Dashboard provides detailed information about Indicators fetched from GreyNoise.
Filters Description
1. Indicator Active Time
- This filter updated the panel based on the selected time range. Default: Last 7 days.
2. Classification Filter
- Filters the Panels according to the selected Classification type. i.e. SUSPICIOUS, MALICIOUS, etc. Default: All.
3. Country Filter
- Filters the Panels according to the entered Country. Default: All.
Panels Description
1. Unique IP Addresses in GreyNoise
- Count of distinct IPs in GreyNoise threat intelligence.
2. Malicious IP Addresses in GreyNoise
- Count of IPs identified as Malicious in GreyNoise threat intelligence.
3. Suspicious IP Addresses in GreyNoise
- Count of IPs identified as Suspicious in GreyNoise threat intelligence.
4. Benign IP Addresses in GreyNoise
- Count of IPs identified as Benign in GreyNoise threat intelligence.
5. Unknown IP Addresses in GreyNoise
- Count of IPs with no definitive classification in GreyNoise threat intelligence.
6. Indicators by Classification
- Distribution of indicators by Threat Verdict Unspecified, Malicious, Suspicious & Undetected.
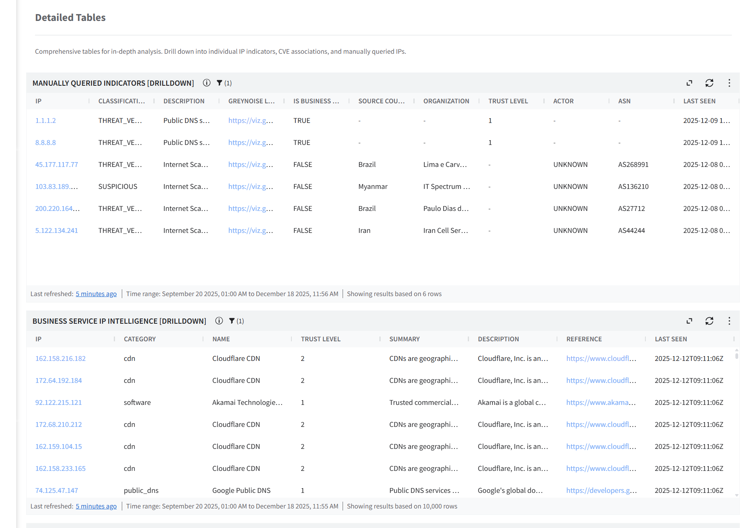
7. Business Service IP Intelligence
- List of IP addresses identified as Business Services, including service category, trust level, and descriptive context.
8. Business Service IPs by Trust Level
- Business service IPs segmented by trust levels
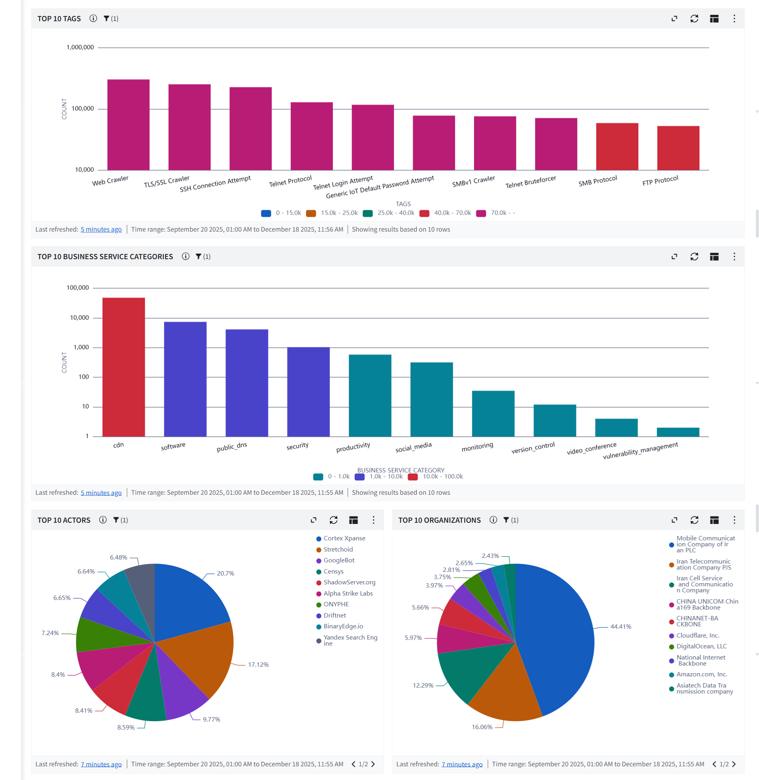
9. Top 10 Organizations
- Highlights organizations (ISPs/Hosting Providers) most frequently associated with observed indicators.
10. Top 10 Actors
- Identifies the most frequently observed threat actors across all indicators.
11. Top 10 Tags
- Lists the most common tags associated with observed indicators.
12. Top 10 ASN
- Displays the top autonomous system numbers related to indicator activity.
13. Top 10 Categories
- Displays the most prevalent network categories.
14. Top 10 OS
- Shows the top operating systems identified from Indicator metadata.
15. Top 10 Business Service Categories
- Highlights business service categories most often linked to indicators.
16. Top 10 Source Countries
- Shows the top Source Countries linked to Indicators.
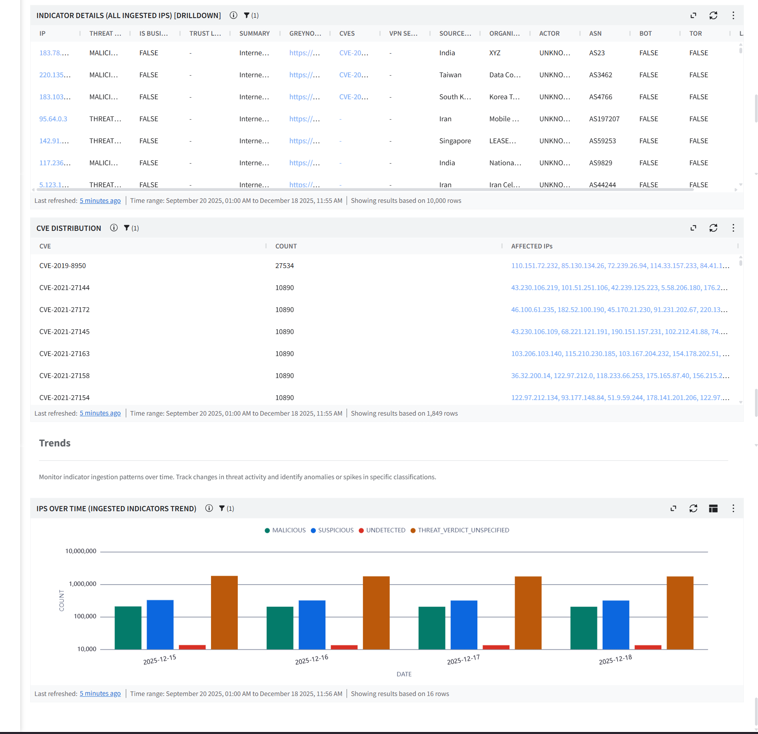
17. IPs Over Time (Ingested Indicators Trend)
- Trend of ingested indicators over time by classification.
18. Indicator Details (All Ingested IPs)
- Recently ingested IP indicators with details.
19. CVE Distribution
- CVEs associated with observed IPs.
20. Manually Queried Indicator
- Displays indicators that users manually investigated.
Screenshots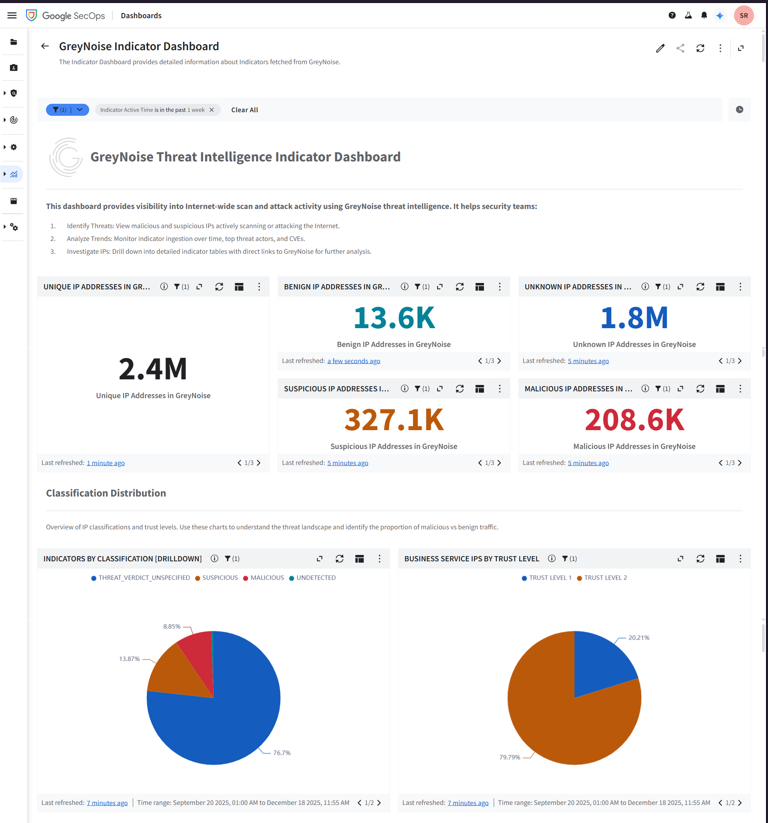

Correlation Dashboard
The Correlation dashboard is designed to identify relationships across indicators and events from other sources.
Filters Description
1. Indicator Active Time Range
- This filter updates the panel based on the selected time range. Default: Last 7 days.
2. Classification Filter
- Filters the Panels according to the selected Classification type. i.e. SUSPICIOUS, MALICIOUS, etc. Default: All.
Panels Description
1. GreyNoise Unique IOC Matches
- Total count of GreyNoise Intelligence IOC matches detected in the environment.
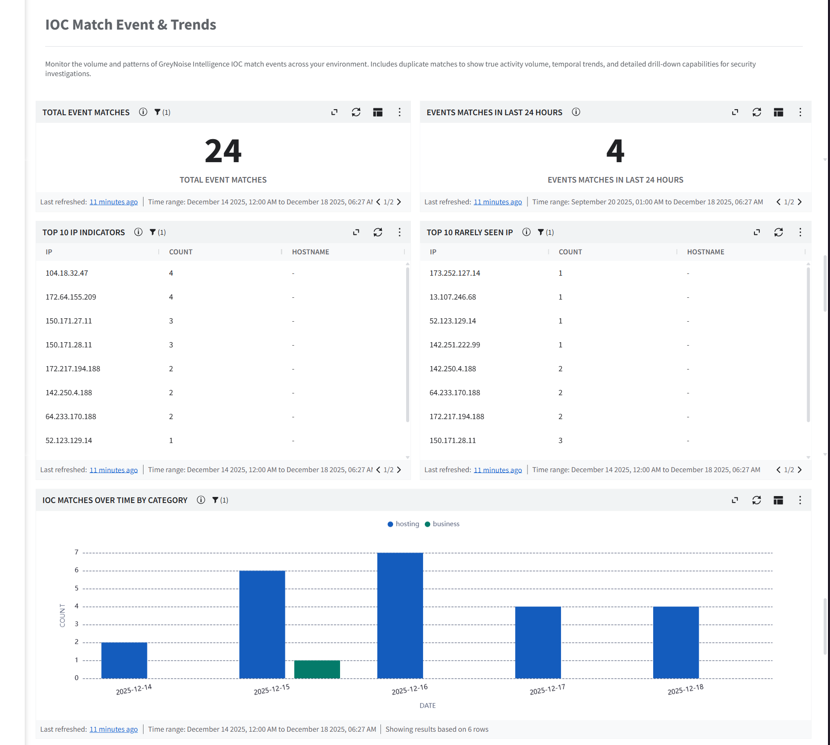
2. Event Matches In last 24 Hours
- Count of GreyNoise Intelligence IOC matches detected in the environment in the last 24 hours.
3. Malicious IPs
- Count of IPs classified as malicious by GreyNoise Intelligence.
4. Suspicious IPs
- Count of IPs classified as suspicious by GreyNoise Intelligence.
5. Benign IPs
- Count of IPs classified as benign by GreyNoise Intelligence.
6. Unknown IPs
- Count of IPs classified as unknown by GreyNoise Intelligence.
7. Total Event Matches
- Count of distinct IP addresses matched against GreyNoise Intelligence.
8. Top 10 IP Indicators
- Table of the 10 most frequently matched IPs from GreyNoise Intelligence with hostname details.
9. IOC by Classification
- Pie chart showing GreyNoise Intelligence IOC distribution by classification.
10. IOC Matches Over Time by Category
- Bar chart showing GreyNoise Intelligence IOC match trends grouped by category.
11. Top 10 Rarely Seen IP
- Table of the 10 least frequently matched IPs from GreyNoise Intelligence.
12. Top 10 Categories
- Pie chart visualizing the top 10 IOC categories of GreyNoise Intelligence IOC matches.
13. IOCs Geolocation Overview
- World map plotting the geographic origin of matched GreyNoise Intelligence IOCs.
14. Correlation Overview
- Comprehensive investigation table displaying GreyNoise Intelligence IOC matches for in-depth analysis.
Screenshot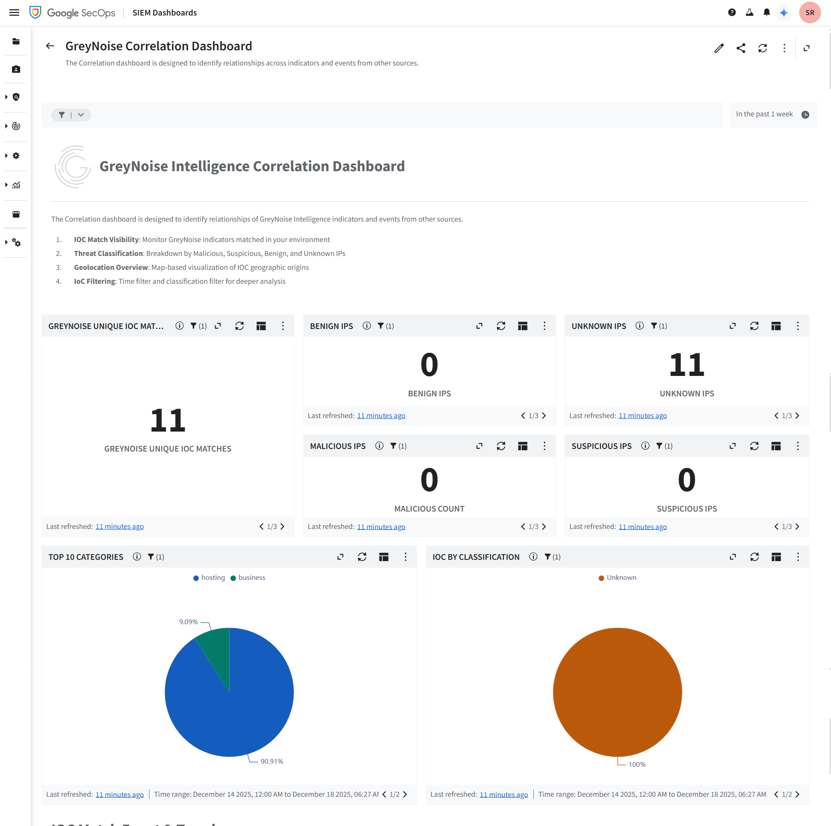

Locate Environment Variables
CHRONICLE_CUSTOMER_ID
Steps to find:
- Log in to the GCP console (console.cloud.google.com).
- From the GCP Navigation Menu, Navigate to Security > Google SecOps.
- Expand Instance details.
- Copy the Customer ID value.
CHRONICLE_REGION
Steps to find:
- Log in to the GCP console (console.cloud.google.com).
- Navigate to Security > Google SecOps.
- Expand Instance details.
- Copy the Region value.
CHRONICLE_PROJECT_NUMBER
Steps to find:
- Log in to the GCP console (console.cloud.google.com).
- On the home page, you can find the project number.
GCP_BUCKET_NAME
Steps to find:
- Log in to the GCP console (console.cloud.google.com).
- From the GCP Navigation Menu, Cloud Storage > Buckets.
- Copy the bucket name (e.g., greynoise-bucket).
GREYNOISE_API_KEY
Steps to find:
-
Navigate to: https://viz.greynoise.io/account/api-key .
-
Copy the API Key.
QUERY
Steps to find:
- Refer to the GreyNoise Query Language documentation
- Construct your query based on filtering requirements.
Limitations
- If the user does not specify the required environment variable while configuring the Cloud Function, the script deployment will fail.
- The CBN parser can only parse GreyNoise entity data.
- The Google SecOps Ingestion API has a payload limit of 4 MB. Logs exceeding this limit will not be ingested and will be skipped. To minimize data loss, please ensure that log sizes remain within the allowed limit.
- Newly ingested entities often take additional time to appear on the dashboard. This latency impacts real-time monitoring and reduces the effectiveness of dashboards for time-sensitive investigations. A support ticket was raised regarding this issue for further investigation and resolution, and its limitation from Google SecOps side.
- When Cloud Run functions execute for more than 30 minutes, Cloud Scheduler shows a "Failed" status with 504 Gateway Timeout errors. This is expected behavior and does not indicate actual function failure. The Cloud Run function continues execution despite the timeout in Cloud Scheduler.
Error Message Example:ERROR <timestamp> [httpRequest.requestMethod:POST] [httpRequest.status: 504] [httpRequest.responseSize: 72 B] [httpRequest.latency:1,799.798 s] [httpRequest.userAgent:Google-Cloud-Scheduler] https://<cloud_function_uri> - Google SecOps does not enforce validation of time-range filters. Users can configure a start time greater than the end time, or set both values to the same value, without receiving an error. Filter validation logic is platform-managed and cannot be extended.
- Time range granularity in Google SecOps follows calendar-based logic. Selecting "Past 1 Week" on a Monday considers the Monday-to-Sunday range, potentially returning only the current day's data if selected at the start of a week. Similar behavior applies to monthly filters.
Troubleshooting
This section describes common issues that may occur during deployment or app runtime, along with steps to resolve them.
- GCloud logs can be used for troubleshooting.
- Log in to the Google Cloud Console using valid credentials.
- Navigate to 'Cloud functions' and click on the deployed function, where you can find the logs module.
- Logs can be filtered using severity.
- If you test the cloud function immediately after deploying it on gcloud, it might not work as expected. To resolve this, wait a few seconds, then test it.
- If the cloud function stops executing because memory exceeds the limit, reconfigure its memory settings and increase the limit.
- The dashboard may be slow to load or unresponsive. This could be due to an unavailable data source, too much data, the query being used, or the way the dashboard is rendered.
- Entities are successfully ingested but not displayed in search results. This could be due to the following reasons.
- The search time range is outside the ingested event's timestamp.
- The ingested entity might be a duplicate entity with the same payload.
GCP Resources/Services Approximate Cost Details
| Service | Standard Configurations | Purpose | Reference |
|---|---|---|---|
| Cloud Functions | Type: Memory: 8192MB CPU: 4.8GHz Execution time per function (ms): 3600 Invocations per month: 1500 Minimum number of instances: 1 | Function / Script which pulls data from GreyNoise Platform using API and ingests into Google SecOps. | Approx cost ~ $66/month https://cloud.google.com/functions/pricing |
| Cloud Storage (Bucket) | Total Amount of Storage: 1 GiB | Storage bucket used to manage API checkpoints | Approx cost ~ $0.02/month https://cloud.google.com/storage/pricing |
| Secret Manager | Access operations: 1500 | Used to maintain credentials. | Approx cost ~ $0/month https://cloud.google.com/secret-manager/pricing |
| Cloud Scheduler | Total number of jobs: 1 | Scheduler that executes the above cloud function at a specific time interval. | Approx cost ~ $0/month https://cloud.google.com/scheduler/pricing |
Note: Users can also calculate (using the pricing calculator) the estimated price of the Google Cloud services used.
Release Notes
V1.0.0
- Provided the ingestion script, which can deploy as a GCP cloud function to collect indicators from the GreyNoise Intelligence Platform and ingest into Google SecOps.
- Provided the parser that processes data ingested from the GreyNoise Intelligence platform and converts it into the Google SecOps UDM data model.
- Provided Detection Rules for threat detection
- Provided Saved Searches for Lookup
- Provided dashboards for visualization
Updated about 1 month ago