
Event Feeds
Getting Started with Feeds
Overview
The Feeds feature allows GreyNoise customers with an Advanced and Elite platform license access to near-real-time visibility into attacker activity across the internet. With Feeds, you can subscribe to curated event streams that notify you when something important happens, such as an IP being reclassified or a CVE showing new exploitation activity.
Feeds are available directly in the GreyNoise Visualizer.
Who Can Access Feeds
- Available to: Advanced and Elite platform customers with appropriate data modules
- IP-based and Tag-based Feeds require any Internet Scanner Intelligence Module (i.e., Triage, Investigate, or Hunt)
- CVE-based and Vendor-based Feeds require an Investigate or higher level Internet Scanner Intelligence Module (i.e., Investigate or Hunt)
- C2-based Feeds require the C2 Intelligence add-on
- Available in: GreyNoise Visualizer
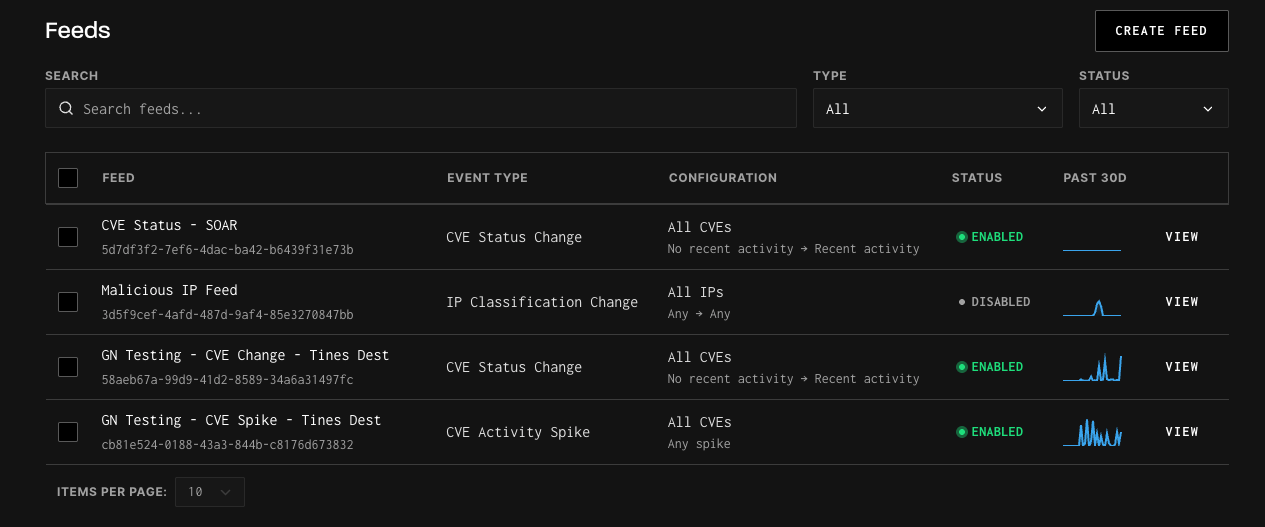
How to Get Started
Access the Feeds Menu
- Log in to the GreyNoise Visualizer.
- Click on Automate from the top level navigation bar and then select Feeds.
Create a new Feed
- Click the “Create Feed” button

In the feed creation menu
- Select the Target Workspace to determine which data source the feed monitors.
-
Global Observation Grid (GOG): Monitor activity across all of GreyNoise's internet-wide sensor network. This is the default and provides the broadest visibility.
-
Your Workspace: If you have deployed sensors in a private workspace, you can subscribe to feed events scoped to traffic hitting your sensors only.
Tip: Workspace-scoped feeds are useful when you want to detect activity targeting your own infrastructure rather than internet-wide trends.
-
- Give the feed a name to help describe the functionality.
- Select the Event Type for this Feed.
- For the CVE Activity Change and IP Classification Change event topics
- Use the "From" selections to determine the state change that will trigger a feed event to be sent.
- Optional: Select or enter any additional configuration options to filter the event list, such as IP ranges or CVE numbers.
- For the CVE Activity Spike, Vendor CVE Spike, and Tag Spike topics
-
Select a Comparison Window to control the baseline and analysis intervals used to detect surges.
Preset options:
Comparison Window Description Hour-Over-Hour last 1 hour vs the 1 hour before that Today vs Yesterday last 24h vs the 24h before that Week-Over-Week last 168h vs the 168h before that 20-Day Baseline last 72h (3 × 24h) vs the 480h (20 × 24h) before that Custom Define your own baseline and analysis intervals. Custom Intervals:
When you select custom, you can configure:-
Interval unit: Days or Hours.
-
Baseline: The number of days (max is customers lookback period) or hours to use as your historical baseline. This represents the "normal" level of activity.
-
Recent: The number of recent days or hours to compare against the baseline. This is the window GreyNoise evaluates for a spike.
Example: A configuration of Baseline = 20 days and Recent = 3 days will alert when the average IP count over the last 3 days exceeds the average over the prior 20 days by your configured threshold.
-
-
Silence Period:
To reduce noise from repeated alerts, you can enable Suppress duplicate events for a period after firing. When enabled, after a spike event fires, GreyNoise will suppress additional events for the same feed for a configurable period.-
Silence Period: The duration to suppress duplicate events (e.g., 1 hour, 24 hours).
-
Silence Unit: Hours or Days.
Tip: Use the silence period to avoid alert fatigue on feeds that monitor high-activity CVEs or vendors. A 1 day silence period is a good starting point for most use cases.
-
-
- Enter the URL to the destination Webhook to receive the feed events.
- Optional: Configure necessary header information to be included when events are sent to the webhook.
- Optional: Use the Send Test Event functionality to test the connection to your destination system.
- Click “Save” when done.
- Once successfully set up, events will appear near-real time, usually within 5 minutes of detection.
Next Steps
- Explore the Feed Reference to understand available feeds.
- Check out Use Cases to see how to operationalize Feeds in your workflows.
Feed Reference
Choosing the Right Feed
| Feed Type | What It Monitors | Best For | Required Module |
|---|---|---|---|
| IP Classification Change | Individual IP reclassifications (e.g., Unknown → Malicious) | Automated blocklisting, alert reprioritization | Triage, Investigate, or Hunt |
| CVE Status Change | CVE lifecycle transitions (e.g., no activity → active exploitation) | Vulnerability management, patch prioritization | Investigate or Hunt |
| CVE Activity Spike | Surge in IP counts targeting a specific CVE | Detecting exploitation campaigns against known vulnerabilities | Investigate or Hunt |
| Vendor CVE Spike | Surge in IP counts across all CVEs associated with a vendor | Vendor-wide risk monitoring, broad patch prioritization | Investigate or Hunt |
| Tag Spike | Surge in IP counts for a GreyNoise tag | Tracking botnets, emerging threats, or scanning activity before CVEs are assigned | Triage, Investigate, or Hunt |
Tip: Not sure whether to use Vendor CVE Spike or Tag Spike? Vendor CVE Spike resolves matching tags to their associated CVEs and monitors CVE-level activity. Tag Spike monitors the tags themselves, making it better for tracking threats that don't yet have CVE assignments.
Current Feed Event Types
The following provides an overview of the available event types.
IP Classification Changes
- What it means: GreyNoise updates an IP’s classification (e.g., Unknown → Malicious).
- Why it matters: Helps you reprioritize alerts or block newly confirmed threats.
- Example event:
{
  "ip": "47.239.198.223",
  "event_type": "ip-classification-change",
  "old_state": "unknown",
  "new_state": "malicious",
  "timestamp": "2025-04-30T08:10:00Z"
}
CVE Status Changes
- What it means: GreyNoise changes how it reports a CVE (e.g., Observed → Active Exploitation).
- Why it matters: Lets you know when in-the-wild exploitation of a CVE begins or stops.
- Example event:
{
  "event_type": "cve-status-change",
  "cve": "CVE-2024-3400",
  "old_state": {
    "activity_seen": false,
    "benign_ip_count_1d": 0,
    "benign_ip_count_10d": 0,
    "benign_ip_count_30d": 0,
    "threat_ip_count_1d": 0,
    "threat_ip_count_10d": 0,
    "threat_ip_count_30d": 0
  },
  "new_state": {
    "activity_seen": true,
    "benign_ip_count_1d": 5,
    "benign_ip_count_10d": 15,
    "benign_ip_count_30d": 25,
    "threat_ip_count_1d": 10,
    "threat_ip_count_10d": 30,
    "threat_ip_count_30d": 50
  },
  "timestamp": "2025-04-30T08:10:00Z"
}
CVE Activity Spike
- What it means: Receive real-time events when a user-defined surge of activity on a CVE occurs.
- Why it matters: Not all CVE exploitation attempts are equally important. A single scanner or researcher probing the internet can create unnecessary noise, leading to alert fatigue. The CVE Activity Spike feed reduces this noise by alerting only when exploitation reaches a user-defined threshold, so you decide what level of activity represents a meaningful surge worth your attention.
- Example event:
{
  "observation_uuid": "1984f8bc-e686-4638-a6fb-d5aa185c78c9",
  "event_type": "cve-activity-spike",
  "criterion": {
    "field": "cve",
    "value_filter": "CVE-1234-5678",
    "interval": "day",
    "lookback_intervals": 1,
    "analysis_intervals": 1,
    "pct_change_threshold": 50,
    "ip_count_threshold": 10,
    "workspace_id": "e4a5be2e-1be0-4105-a5e2-51e6a5525fa0"
  },
  "baseline_counts": {
    "total_ip_count": 50,
    "benign_ip_count": 40,
    "threat_ip_count": 10
  },
  "analysis_counts": {
    "total_ip_count": 100,
    "benign_ip_count": 80,
    "threat_ip_count": 20
  },
  "delta_total_ip_count": {
    "absolute": 50,
    "percentage": 100
  },
  "timestamp": "2025-04-30T08:10:00Z"
}
Vendor CVE Spike
-
What it means: Receive real-time events when a user-defined surge of activity on a vendor occurs.
-
Why it matters: Individual CVEs and tags are constantly added, updated, and deprecated as new research emerges, creating overhead and blind spots if teams have to manage tracking manually.
The Vendor Activity Spike feed reduces this complexity by alerting only when activity across a vendor meaningfully increases. As vulnerabilities and tags associated with a vendor change over time, the feed automatically stays up to date, so you can focus on when attacker interest spikes, without worrying about which specific CVEs to track.
When you search for a vendor name (e.g., "Palo Alto"), the feed uses wildcard matching to find all tags containing that term, then resolves those tags to their associated CVEs. The feed then monitors activity for those CVEs. If you want to monitor tag activity directly without CVE resolution, use Tag Spike instead.
-
Use cases:
- Vendor-wide vulnerability monitoring: Monitor all CVE exploitation activity across a vendor's products without manually tracking individual CVEs as they're published or updated.
- Patch prioritization: Prioritize patching cycles based on vendor-level exploitation trends. A spike in activity for your firewall vendor signals it's time to accelerate remediation.
- Proactive threat hunting: Use vendor spikes as an early warning signal to investigate whether associated CVEs have been attempted against your environment.
-
Syntax:
- Vendor names are not case sensitive. For example,
palo altoorCiscowill both work.
- Vendor names are not case sensitive. For example,
-
Example event:
{
  "observation_uuid": "650bb0d4-5f78-4d5b-b3d1-0a95ce975d46",
  "event_type": "vendor-cve-spike",
  "criterion": {
    "field": "vendor",
    "value_filter": "acme",
    "interval": "hour",
    "lookback_intervals": 24,
    "analysis_intervals": 1,
    "pct_change_threshold": 50,
    "ip_count_threshold": 10,
    "workspace_id": "e4a5be2e-1be0-4105-a5e2-51e6a5525fa0"
  },
  "baseline_counts": {
    "total_ip_count": 80,
    "benign_ip_count": 40,
    "threat_ip_count": 40
  },
  "analysis_counts": {
    "total_ip_count": 180,
    "benign_ip_count": 90,
    "threat_ip_count": 90
  },
  "delta_total_ip_count": {
    "absolute": 100,
    "percentage": 125
  },
  "timestamp": "2025-04-30T08:10:00Z"
}
Tag Spike
Tag Spike feeds monitor for sudden increases in activity associated with specific GreyNoise tags. When you configure a Tag Spike feed, GreyNoise monitors significant changes in IP counts for tags that match your filter criteria over a rolling 2-hour window.
-
What it means: Receive real-time events when a user-defined surge of activity on a GreyNoise tag occurs.
-
Why it matters: Tag Spike lets you monitor activity for specific threats, botnets, or scanning behaviors directly by tag name. When you search for a tag, vendor, or product name (e.g., "Palo Alto"), the feed uses wildcard matching to find all tags containing that term and monitors their activity directly. Unlike Vendor CVE Spike, which resolves matching tags to their associated CVEs, Tag Spike tracks the tags themselves.
-
Use cases:
- Monitoring emerging exploit activity for specific products or vendors before CVEs are assigned
- Tracking botnets, scanners, or malware families by tag name
- Getting early warning when threat actors ramp up scanning for specific technologies
-
Syntax:
- Tag names are not case sensitive. For example, Mirai or cisco will both work.
-
Example event:
{
  "observation_uuid": "40a0cb97-0098-4c10-b7f5-1b85d7dc25f0",
  "event_type": "tag-spike",
  "criterion": {
    "field": "tag",
    "value_filter": "mirai",
    "interval": "hour",
    "lookback_intervals": 2,
    "analysis_intervals": 1,
    "pct_change_threshold": 50,
    "ip_count_threshold": 10,
    "workspace_id": "e4a5be2e-1be0-4105-a5e2-51e6a5525fa0"
  },
  "baseline_counts": {
    "total_ip_count": 120,
    "benign_ip_count": 80,
    "threat_ip_count": 40
  },
  "analysis_counts": {
    "total_ip_count": 250,
    "benign_ip_count": 160,
    "threat_ip_count": 90
  },
  "delta_total_ip_count": {
    "absolute": 130,
    "percentage": 108.33
  },
  "timestamp": "2025-04-30T08:10:00Z"
}
Payload Field Reference
| Field | Description |
|---|---|
observation_uuid | Unique identifier for this feed. |
event_type | The type of spike event (cve-activity-spike, vendor-cve-spike, tag-spike). |
criterion | The feed configuration that triggered this event, including the monitored field, filter value, interval settings, and thresholds. |
criterion.field | The entity being monitored (cve, vendor, or tag). |
criterion.value_filter | The filtered CVE, vendor name, or tag name being tracked. |
criterion.interval | The time unit for the baseline and analysis windows (day or hour). |
criterion.lookback_intervals | Number of intervals used for the baseline window. |
criterion.analysis_intervals | Number of intervals used for the recent/analysis window. |
criterion.pct_change_threshold | The percentage change threshold that triggered the spike. |
criterion.ip_count_threshold | The minimum IP count required for the spike to trigger. |
criterion.workspace_id | The workspace being monitored for the feed. |
baseline_counts | IP counts averaged over the baseline window. |
analysis_counts | IP counts over the analysis (recent) window. |
delta_total_ip_count.absolute | The absolute difference in total IP count between analysis and baseline. |
delta_total_ip_count.percentage | The percentage change in total IP count between analysis and baseline. |
timestamp | ISO 8601 timestamp of when the event was generated. |
Tip: The timestamp field ensures each event is uniquely identifiable, which prevents deduplication issues on webhook platforms that collapse identical payloads.
New Callback IP
- What it means: Receive an event when a new callback IP is detected in exploit payloads observed by GreyNoise sensors. A callback IP is a destination that a compromised device is instructed to contact after infection — the downstream infrastructure used for payload delivery, malware staging, or command-and-control communication.
- Why it matters: Callback IPs represent the next stage of the attack chain beyond initial scanning. While Internet Scanner Intelligence tracks who is scanning and exploiting, callback feeds surface where those exploits point victims after a successful compromise. Getting notified the moment a new callback IP appears lets you proactively block C2 infrastructure, enrich your threat intelligence, and investigate whether the callback destination has been contacted from your environment.
- Configuration options:
- Only send events for specific IPs: Optionally filter the feed to only fire events when specific callback IPs are detected. Leave unchecked to receive events for all new callback IPs.
- Example event:
{
  "event_type": "new-callback-ip",
  "ip": "203.0.113.42",
  "workspace_id": "524d9189-4a59-4051-bdfb-60c2abc1f2de",
  "timestamp": "2025-04-30T08:10:00Z"
}
Payload Field Reference
| Field | Description |
|---|---|
event_type | new-callback-ip |
ip | The callback IP address detected in exploit payloads. |
workspace_id | The workspace where the observation occurred. |
timestamp | ISO 8601 timestamp of when the event was generated. |
Tip: Callback IPs may not appear in Internet Scanner Intelligence, since they are derived from payload analysis rather than direct scanning observation. Use the Callback tab in the visualizer, the callback IP API endpoint, or the callback_ips GNQL parameter to correlate callback IPs with scanner IPs.
Webhook Delivery Behavior
Event Delivery
Feed events are delivered to your configured webhook URL as HTTP POST requests with a JSON body. Events are sent near-real-time, typically within 30 seconds of detection.
Deduplication
Each event includes a timestamp field, ensuring every event is uniquely identifiable. If your webhook platform deduplicates payloads with identical bodies, these fields prevent legitimate distinct events from being collapsed.
Test Events
The Send Test Event button in the feed creation UI sends a sample event using the same payload structure as real events, with a live timestamp. Use this to validate that your webhook endpoint is correctly receiving and parsing feed events before going live.
Note: Test events use realistic sample data but do not represent actual observed activity. The timestamp reflects the time the test was sent.
Use Cases for Feeds
Automated IP Blocking (IP Classification Change)
When GreyNoise reclassifies an IP to malicious, automatically update your defenses. Use a SOAR playbook to add the IP to your firewall or WAF blocklist, reducing attacker dwell time. Alternatively, trigger a Slack or Teams notification to your SOC so analysts can investigate the IP's activity in context.
Vulnerability Lifecycle Management (CVE Status Change)
When a CVE transitions to active exploitation, automatically create a ticket for your vulnerability management team. This is especially valuable for organizations running regular patch cycles — a CVE Status Change feed can escalate a vulnerability from "scheduled patch" to "emergency remediation" without anyone manually checking dashboards.
Exploitation Campaign Detection (CVE Activity Spike)
Monitor specific CVEs that are relevant to your environment. When a CVE you're tracking shows a sudden surge in scanning or exploitation attempts, you get an early signal that a campaign may be underway. Pair this with your SIEM to correlate the spike against your own logs and determine whether you've been targeted.
Vendor Risk Monitoring (Vendor CVE Spike)
Track exploitation trends across an entire vendor's product portfolio. If your organization relies heavily on a specific vendor's infrastructure (e.g., Palo Alto, Cisco, Fortinet), a Vendor CVE Spike feed gives you a single signal when attacker interest in that vendor increases, without needing to manually track every individual CVE as they're published.
Emerging Threat Tracking (Tag Spike)
Catch threats early by monitoring GreyNoise tags for botnets, malware families, or scanning tools. Tag Spike is particularly useful for threats that don't yet have CVE assignments, such as new botnets or zero-day scanning activity. When a tag you're watching shows a sudden increase in associated IPs, it's time to investigate.
Example Automation Scenarios
| Scenario | Feed Type | Automated Action |
|---|---|---|
| IP reclassified to Malicious | IP Classification Change | Add to firewall blocklist via SOAR playbook |
| CVE moves to Active Exploitation | CVE Status Change | Create ticket for vulnerability management team |
| Spike in CVE-2024-XXXX exploitation | CVE Activity Spike | Trigger SIEM correlation query against internal logs |
| Vendor-wide exploitation increase | Vendor CVE Spike | Notify security lead, escalate patching for that vendor |
| New botnet activity surge | Tag Spike | Alert threat intel team, begin threat hunt |
Troubleshooting
I'm not receiving events
Verify that your webhook URL is reachable from the public internet and returns a 2xx status code. Use the Send Test Event button in the feed configuration to confirm connectivity. Check that your feed's event type and filter criteria match the activity you're expecting. For example, a CVE Activity Spike feed with a very high threshold may not fire if activity hasn't reached that level.
I'm receiving too many events
Consider adjusting your feed configuration. For activity spike feeds, increase the percentage change threshold or IP count threshold to filter out smaller fluctuations. You can also enable the Silence Period to suppress duplicate events for a configurable duration after a spike fires.
My webhook is receiving duplicate events
Some webhook platforms deduplicate payloads with identical bodies. Each GreyNoise feed event includes a unique timestamp — use that field as the deduplication key rather than comparing the full payload body.
Events don't match my expected payload format
If you previously integrated with an older version of a feed payload, the structure may have changed. Check the example payloads in the Feed Reference section for the current format. If you need help migrating, contact [email protected].
Updated 4 months ago