
Transporters
The GreyNoise Transporter enables you to turn almost anything into a Profile that you can assign to one of your Sensors. A Transporter is any Raspberry Pi 4/5 device running a custom image developed for turning hardware devices and software into GreyNoise Sensor Profiles. It works by establishing a secure tunnel between your Sensor and a Transporter. When a device is connected to the Ethernet port on the Transporter and the Transporter is assigned to a Sensor, you expose the device as the Profile for that Sensor. On the Transporter, networking rules ensure that the transported device can only communicate outbound through the Sensor, removing the risk of exposing other devices on your network to compromise.
To anyone on the internet accessing your Sensor, they'll see your transported device and everything it exposes, just like any other GreyNoise Profile.
What Can Be Transported?
The Transporter works with any device or system that uses DHCP to get an IP address when connected to it via Ethernet. Here are some common examples:
- The WAN port of a home router such as a TP-Link or ASUS
- The WAN port in the default configuration of these devices is usually configured to request a DHCP address while the LAN ports usually provide DHCP addresses.
- An ICS (Industrial Control System) device
- A desktop system running Windows
- Another Raspberry Pi running software you want to expose on a sensor:
- An SSH server
- A mail server
- Other honeypot software
- Custom software that you've written
- You get where this is going 😉
- A VM running on hardware where you can connect a physical Ethernet port to the VM
Take that old router out of the closet and put it to work. Connect spare enterprise network infrastructure to gain visibility into attacks against devices used by your organization. Experiment with exposing software and services that your team supports. The possibilities are endless.
Getting Started
Choosing Hardware
Starter Kits
The fastest way to get started, if you don’t already have a Raspberry Pi 4 or 5, is with one of the many Raspberry Pi starter kits available.
- Amazon:
- CanaKit (Direct)
- SparkFun
Individual Components
If you prefer to select components yourself, here's what you'll need.
- Raspberry Pi 4 or 5
- MicroSD card, 16GB+ from a reputable brand and source
- Power adapter compatible with the Raspberry Pi you choose
- Raspberry Pi 5: A 27W+ USB-C power adapter is recommended
- Raspberry Pi 4: A 15W+ USB-C power adapter is recommended
- Optional:
- MicroHDMI cable for connecting to the Pi directly
- Case
Network
In most cases, all you need is a wireless network to which your Transporter can connect. This could be your home network or another location with a wireless network that you own.
Selecting a Device to Transport
You can plug almost anything with an Ethernet port into your Transporter to put in on the internet behind your Sensor. If the device requests a DHCP address when you plug it in to an Ethernet port, it will work.
❗Ideally the device you plug in exposes ports/services that an actor on the internet can interact with.
Since you'll be exposing this device directly to the internet, knowing how to reset the device in the event of a compromise is advised.
- For hardware devices like routers and switches this is often as simple as a reset button.
- For physical computers running Windows, macOS, Linux, or another operating system re-imaging the storage with a known good image will generally be sufficient.
- For virtual machines, taking a snapshot of the device in a known good state will help you quickly reset it.
Transporting
With your Raspberry Pi in-hand, you’re ready to create a Profile and transport the device you chose onto the internet for all to see.
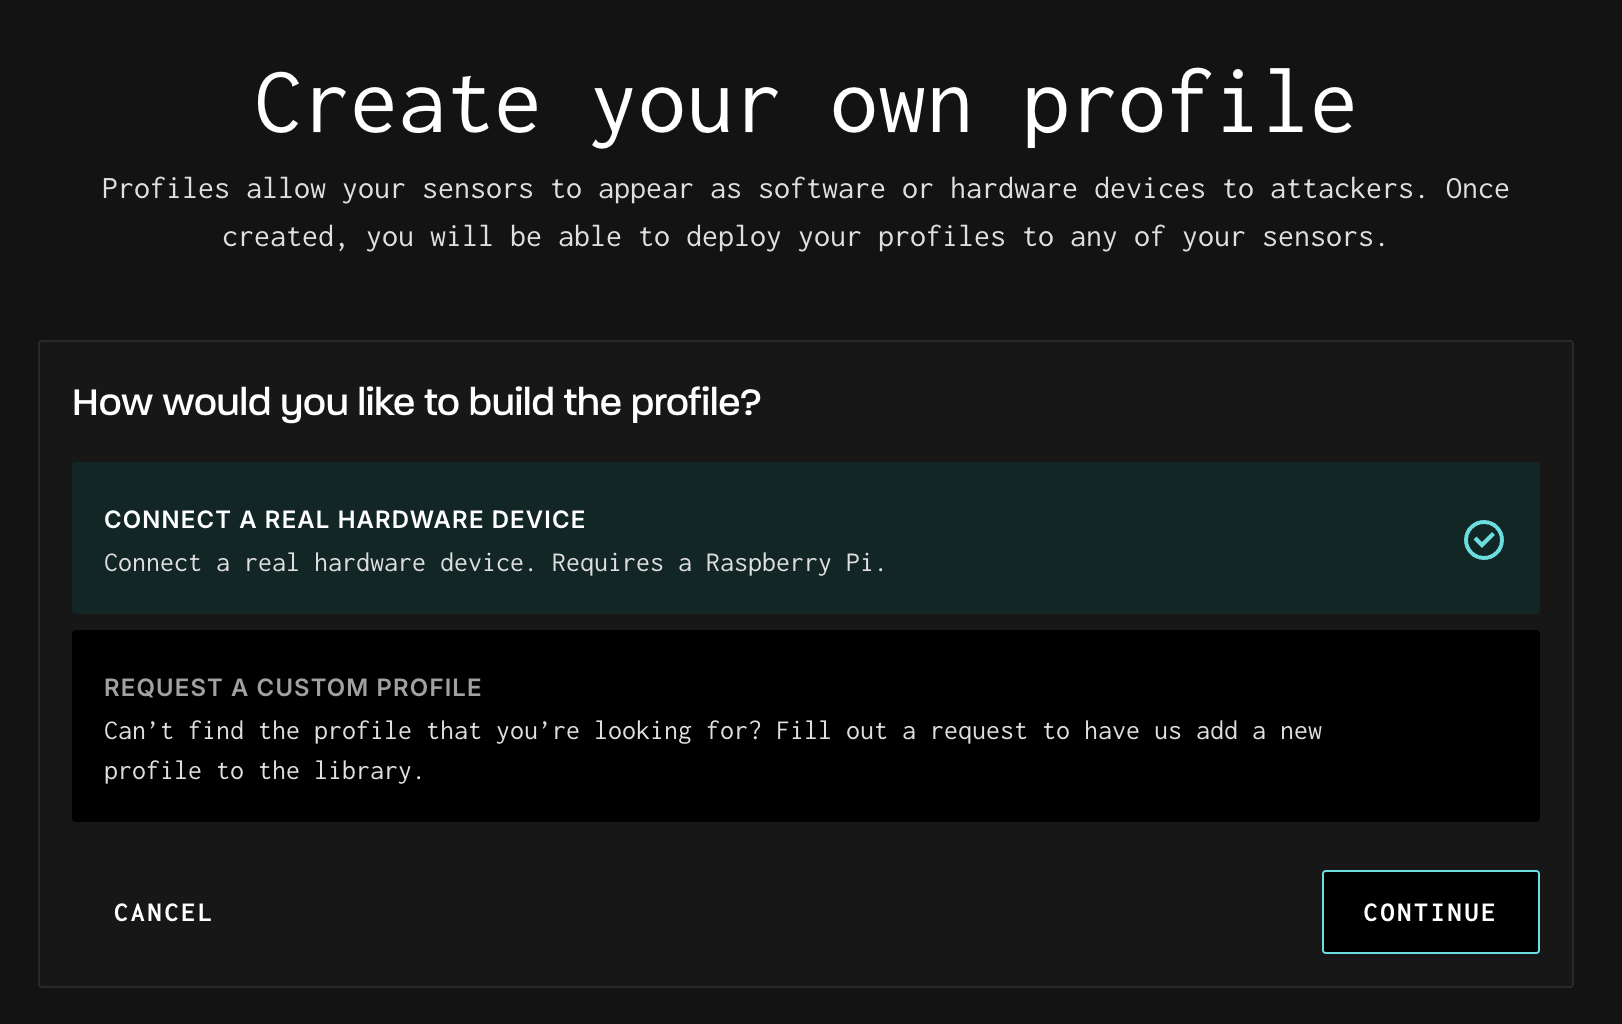
Create a New Profile
From the Sensors -> Profiles submenu, click Create Profile. On the form that opens, select Connect a Real Hardware Device and click continue.
A new form to enter the details of the Profile that your Transporter will expose appears.
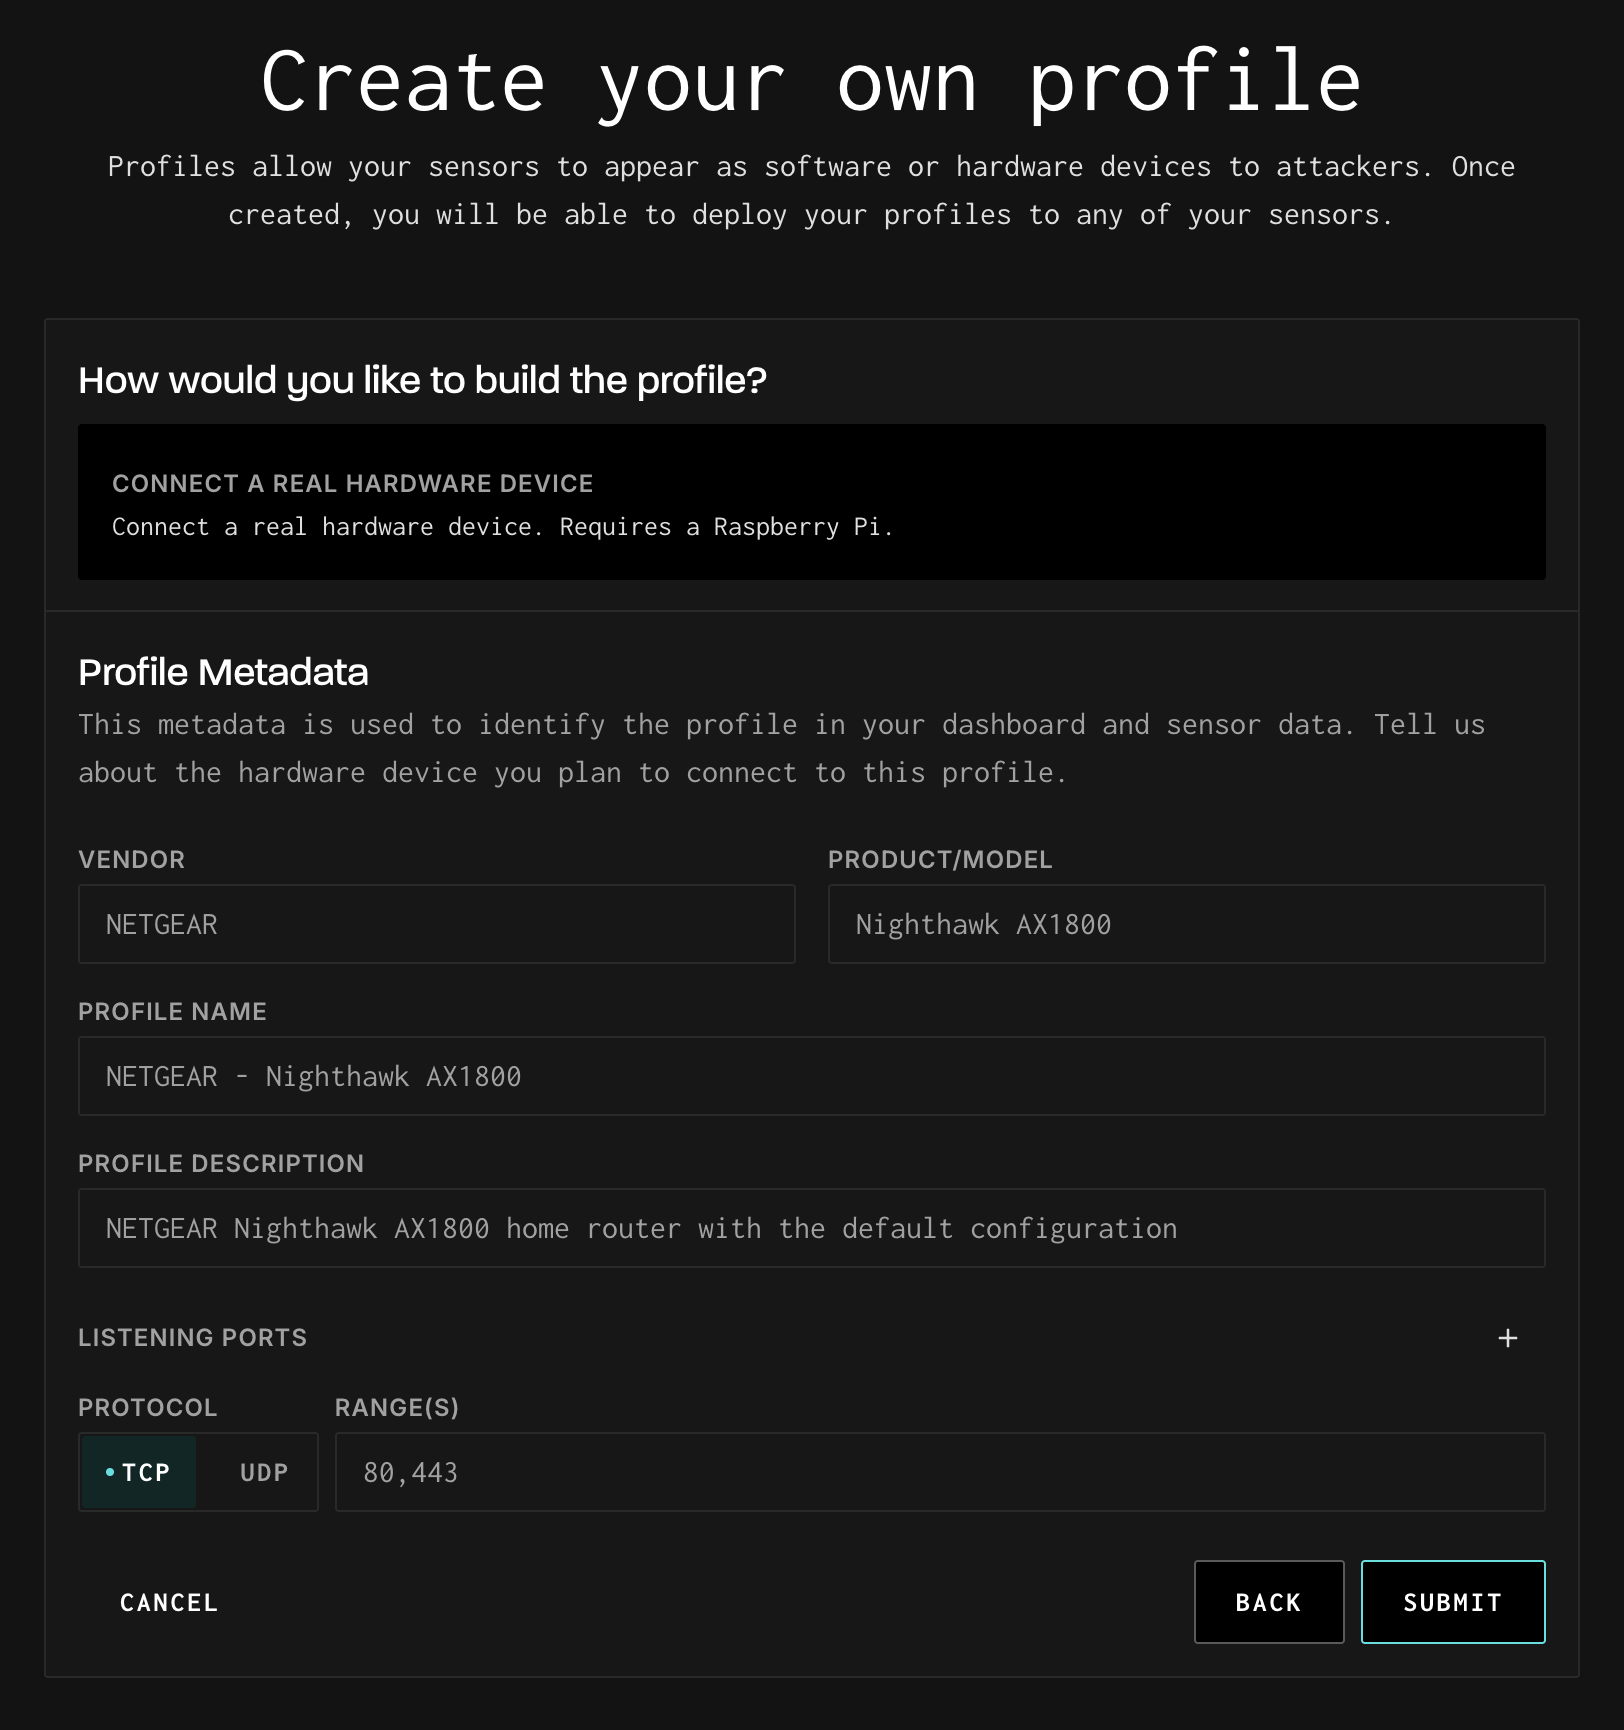
All of the details for your Profile, including the Listening Ports, are strictly descriptive. Any traffic received by a Sensor assigned to your Profile will be received by the transported device. These details help you or another user in your Workspace understand what is exposed by the Sensor with this Profile assigned, along with associating any traffic seen by the assigned Sensor with this Profile when viewed in the Session Explorer.
The Profile Name is a combination of the Vendor and Product/Model by default, but you can name it whatever makes sense. If you have multiple Listening Ports ranges or different protocols, new entries can be added using the + icon on the right side of the form. Generally, you'll only need one Listening Ports entry per protocol as you can specify multiple ports and ranges in the field.
For example, all of these Listening Ports are valid:
80,44380,443,1000-20001-65535
On clicking Submit you'll be taken to the final step in the Visualizer, downloading and configuring the Transporter image.
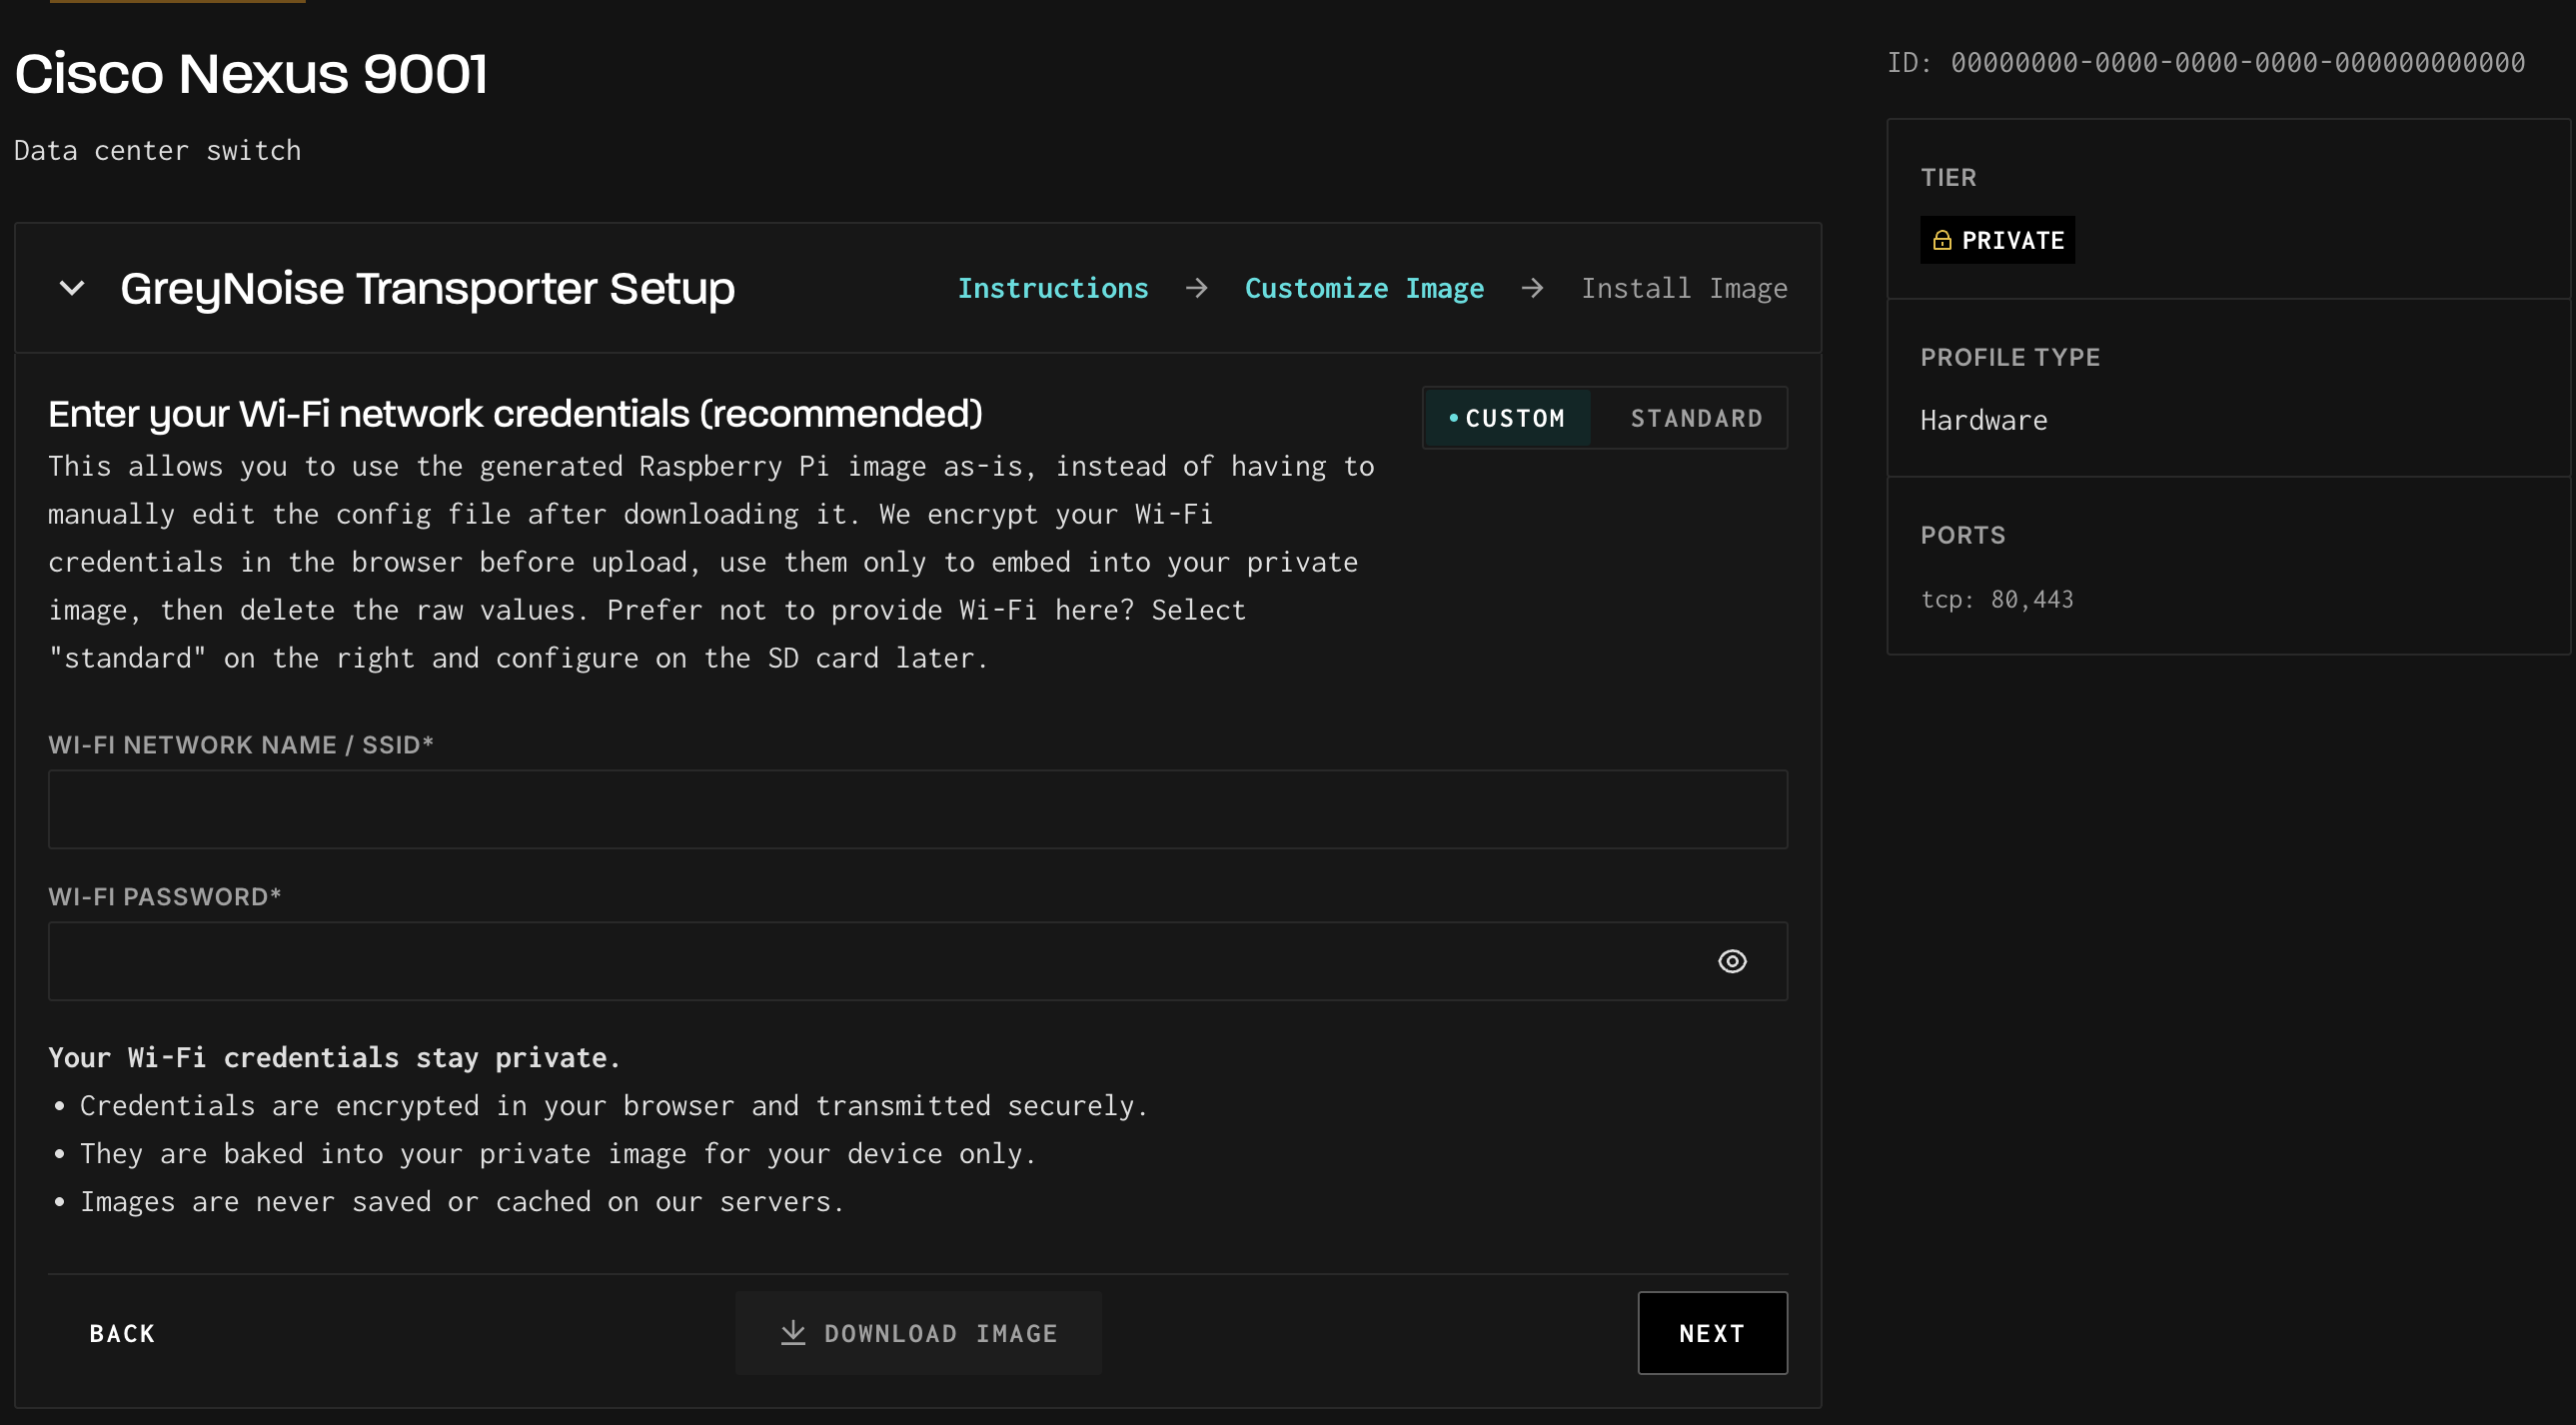
Configuring the Transporter
With your new (or existing hardware profile) ready, you're ready to configure the Transporter. If you're coming here from the Create a New Profile steps, you should see the configuration steps for the Transporter in the Visualizer.
If you are configuring a new Transporter with an existing profile, navigate to theSensors > Profiles > Profile Detailspage for your profile.
The Custom configuration method is recommended. With it, we ask for your WiFi credentials so that we can automatically configure your image while it downloads, along with the Profile ID for your Profile and your API Key for Greynoise. The image that you download thus requires no configuration. Plug your SD card into your Transporter after imaging it, and your Transporter will connect to GreyNoise.
If you prefer to manually configure your Transporter, skip to that section Manual.
Before we get started, install the Raspberry Pi Imager application for your operating system of choice (or obligation 😜).
Custom (Recommended)
Enter the WiFi credentials for the network to which your Transporter will connect and click Download Image to download your customized Transporter image.
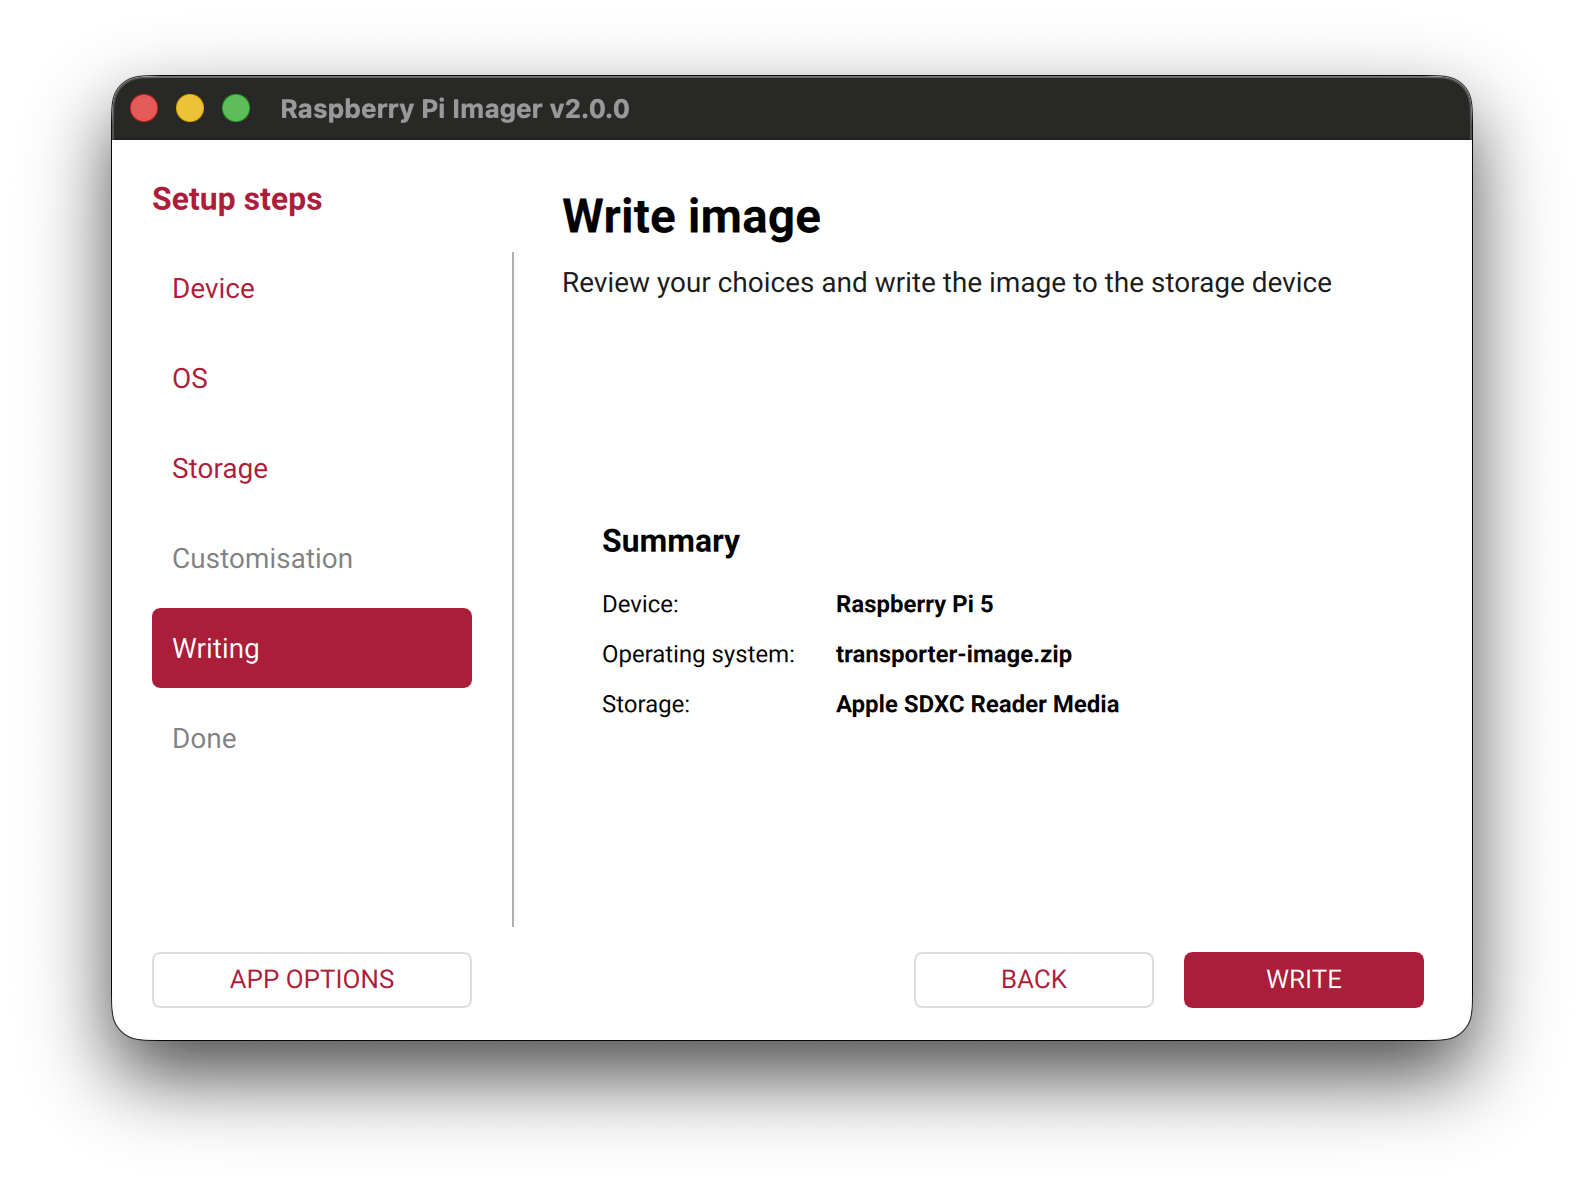
Insert your SD card into your computer with the Raspberry Pi Imager application and image the SD card with our custom Transporter image:
- Open the Raspberry Pi Imager application
- Select your Raspberry Pi model in the Raspberry Pi Device field.
- Select Use Custom in the Operating System field and select the Transporter image you downloaded on your filesystem.
- Select the SD card in the Storage field
Your imager application should look something like this. Click Next to image the SD card.
Manual
All Operating Systems
Download the Transporter image by clicking the Download Image button.
Insert your SD card into your computer with the Raspberry Pi Imager application and image the SD card with our custom Transporter image:
- Open the Raspberry Pi Imager application
- Select your Raspberry Pi model in the Raspberry Pi Device field.
- Select Use Custom in the Operating System field and select the Transporter image you downloaded on your filesystem.
- Select the SD card in the Storage field
Your imager application should look something like this. Click Next to image the SD card.

You'll need to configure the newly imaged SD card with your Profile, API Key, and WiFi Settings. The API_KEY and PROFILE_ID are available on the GreyNoise Transporter Setup card on the Profile Details page for your Profile.
Find the instructions to configure the Transporter on your operating system below.
Linux
After imaging your SD card:
- Open a terminal.
- Run
lsblkto identify the device name of your SD card (e.g./dev/sda).- You should see three partitions with sequentially numbered names underneath this device, e.g.
/dev/sda1,/dev/sda2,/dev/sda3. - The second partition is the one you want to use, e.g.
/dev/sda2.
- You should see three partitions with sequentially numbered names underneath this device, e.g.
- Create a mount point for the second partition:
sudo mkdir /mnt/transporter - Mount the partition:
sudo mount <device identified in step 2.2> /mnt/transporter
The partition should now be mounted at /mnt/transporter, and you can access and modify the files at that path.
Update the Transporter configuration files:
- Edit the GreyNoise config - Open greynoise.cfg and update the values in the file with your API Key and Profile ID:
API_KEY="<your API key>"
PROFILE_ID="<your Profile ID>"- Edit the Network config - Open network.cfg and update the values in the file with the username and password for your WiFi Network:
WIFI_SSID="<WiFi SSID>"
WIFI_PASSWORD="<WiFi Password>"
When you're finished, unmount the partition: sudo umount /mnt/transporter.
MacOS
After imaging your SD card, remove and re-insert the SD card into your Mac. If the drive does not mount automatically (you should be able to access a volume called gnfs under /Volumes in Finder), then follow the steps below to mount it manually.
- Insert the SD card into your Mac.
- Open Disk Utility.
- In the View menu, select "Show All Devices".
- Select the SD card in the side bar.
- Click the second partition (this should be the
gnfspartition). - Click the "Mount" button in the toolbar.
The partition should now be mounted in a volume under /Volumes and accessible in Finder.
Update the Transporter configuration files:
- Edit the GreyNoise config - Open greynoise.cfg and update the values in the file with your API Key and Profile ID:
API_KEY="<your API key>"
PROFILE_ID="<your Profile ID>"- Edit the Network config - Open network.cfg and update the values in the file with the username and password for your WiFi Network:
WIFI_SSID="<WiFi SSID>"
WIFI_PASSWORD="<WiFi Password>"
When you're finished, click the "Eject" button in the toolbar to unmount the partition or use Finder's ⏏ button.
Windows
After imaging your SD card, remove and re-insert the SD card into your PC. Windows may display notifications asking if you want to scan the drive for errors. These can be ignored.
Check File Explorer to see if the two partitions, boot and gnfs, on the SD card mounted automatically.
If the partitions did not automatically mount, follow the steps below to mount the gnfs partition manually.
- Press
Win + Xand select "Disk Management". - In the lower pane, the SD card should appear with all partitions (you may need to scroll down).
- If the 2nd partition (
gnfs) has a drive letter, it's already mounted. - If not, then mount it by right-clicking the partition and selecting "Change Drive Letter and Paths...". Then click "Add" and assign a drive letter.
- The partition should now be accessible in File Explorer under the drive letter you assigned.
- If the 2nd partition (
Update the Transporter configuration files:
- Edit the GreyNoise config - Open greynoise.cfg and update the values in the file with your API Key and Profile ID:
API_KEY="<your API key>"
PROFILE_ID="<your Profile ID>"- Edit the Network config - Open network.cfg and update the values in the file with the username and password for your WiFi Network:
WIFI_SSID="<WiFi SSID>"
WIFI_PASSWORD="<WiFi Password>"
When you're finished, right click the drive in File Explorer and "Eject" it before removing the SD card.
Running the Transporter
With your imaged and configured SD card in hand:
- Plug the micro SD card into your Raspberry Pi.
- Connect power to your Raspberry Pi to boot it.
- Connect the device that will be used for your Profile via Ethernet. Make sure it's powered on.
Without further ado, your Transporter is ready to assign to your Sensor! From the Transporter setup page or the Profile's details page, click Assign to Sensor to assign the Transporter's Profile to your Sensor.
Give it five minutes, and try connecting to your transported device through the Sensor's IP address to confirm your Transporter is working. If the transported device is exposing ports or services, you should be able to connect to them through your Sensor as if the device were itself, connected directly to the public internet.
Give it another five minutes or so and navigate to the Analyze menu. You should see traffic hitting your Sensor and in turn, your transported device, in the Session Explorer.
Updated 3 months ago