
CrowdStrike Next-Gen SIEM Use Case Guide 4
Detect Outbound Connections to Threat Infrastructure
Detect Outbound Connections to Threat Infrastructure
Overview
Internal corporate assets should not initiate outbound connections to internet infrastructure known to be hostile. When they do, it signals something far more serious than a misconfigured firewall rule; it means a device inside your network is actively reaching out to the threat actor, not the other way around.
This pattern bypasses traditional perimeter defenses and is often a strong indicator of compromise, active C2 beaconing, data exfiltration, or botnet participation.
The GreyNoise Solution
By matching outbound firewall, proxy, and EDR telemetry against the GreyNoise lookup file, SOC teams can immediately surface hosts communicating with infrastructure GreyNoise classifies as malicious. Instead of combing through hundreds of egress events, analysts receive a pre-filtered list of compromised endpoints that need immediate containment.
Prerequisites
Ensure your environment meets these prerequisites before beginning the setup:
Tools and Access
| Prerequisites | Details |
|---|---|
| CrowdStrike Falcon | Falcon Next-Gen SIEM or Falcon Insight XDR |
| GreyNoise App | GreyNoise Threat Intel app for Foundry Templates |
| API Key | GreyNoise API key configured in the app under Configuration |
| Firewall Logs | Palo Alto or equivalent firewall logs ingested in the NG-SIEM |
| Log Fields (ECS mapped) | destination.ip, network.direction, #event.type[] |
| ECS Mapping | Your firewall data is accurately mapped to the ECS schema before being ingested into NG-SIEM. #event.type[] should contain allowed as a value. |
Implementation Steps
The full detection query is assembled in four progressive stages. Each stage is explained below before the complete query is presented.
Note: Replace <VENDOR_NAME> with the name of your vendor when you execute the query.
Step 1: Filter Inbound and Internal Traffic
Isolate outbound traffic only. Filter out internal-to-internal traffic and any blocked connections. The logic is to focus only on successful connections, leaving your network to public internet destinations.
#Vendor = <VENDOR_NAME>
| network.direction="outbound"
Step 2: Retain Only Allowed Connections
#Vendor = <VENDOR_NAME>
| network.direction="outbound"
| array:contains(array="event.type[]", value="allowed")
Step 3: Enrich Destination IPs against GreyNoise
#Vendor = <VENDOR_NAME>
| network.direction="outbound"
| array:contains(array="event.type[]", value="allowed")
| match(file="ti_greynoise_indicators.csv", field=[destination.ip], column=[source.ip])
Full Detection Query
The complete standardized CrowdStrike implementation, combining all steps and detection logic:
#Vendor = <VENDOR_NAME>
// Filter to outbound direction only — inbound excluded from this use case
| network.direction="outbound"
// Filter local network IPs
| !cidr(destination.ip, subnet=["0.0.0.0/32", "10.0.0.0/8", "172.16.0.0/12", "192.168.0.0/16"])
// Only consider connections that were allowed
| array:contains(array="event.type[]", value="allowed")
// Enrich destination IPs against GreyNoise threat intelligence
| match(file="ti_greynoise_indicators.csv", field=[destination.ip], column=[source.ip])
// Keep only destination IPs that GreyNoise flags as malicious — suspicious can be added if needed
| source.ip.greynoise.is.classification = "malicious"
// Aggregate by internal source IP and the threat destination — count gives connection volume
| groupBy([source.ip], function=[count(as=connection_count), collect(fields=[destination.ip], separator=",")], limit=max)
// Threshold filter — internal hosts with >= 3 connections to threat infra are prioritized
| connection_count >= 3
// Sort by connection volume descending — most active beaconing/exfil candidates surface first
| sort(connection_count, limit=max)
Step 4: Save as a Correlation Rule
Once the search is verified end-to-end, save it as a Correlation rule to run automatically and generate a detection or case:
Steps:
- Go to Next-Gen SIEM → Rules.
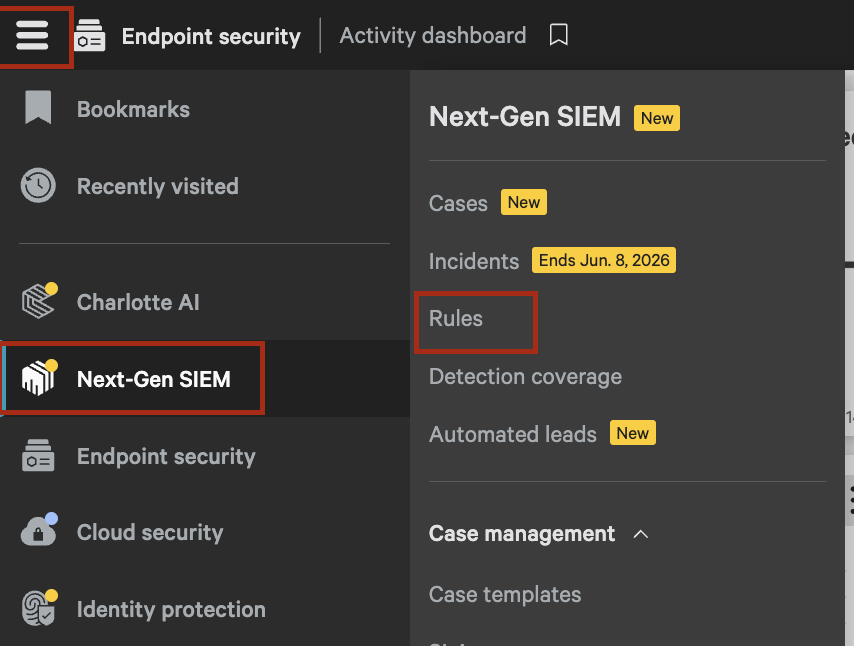
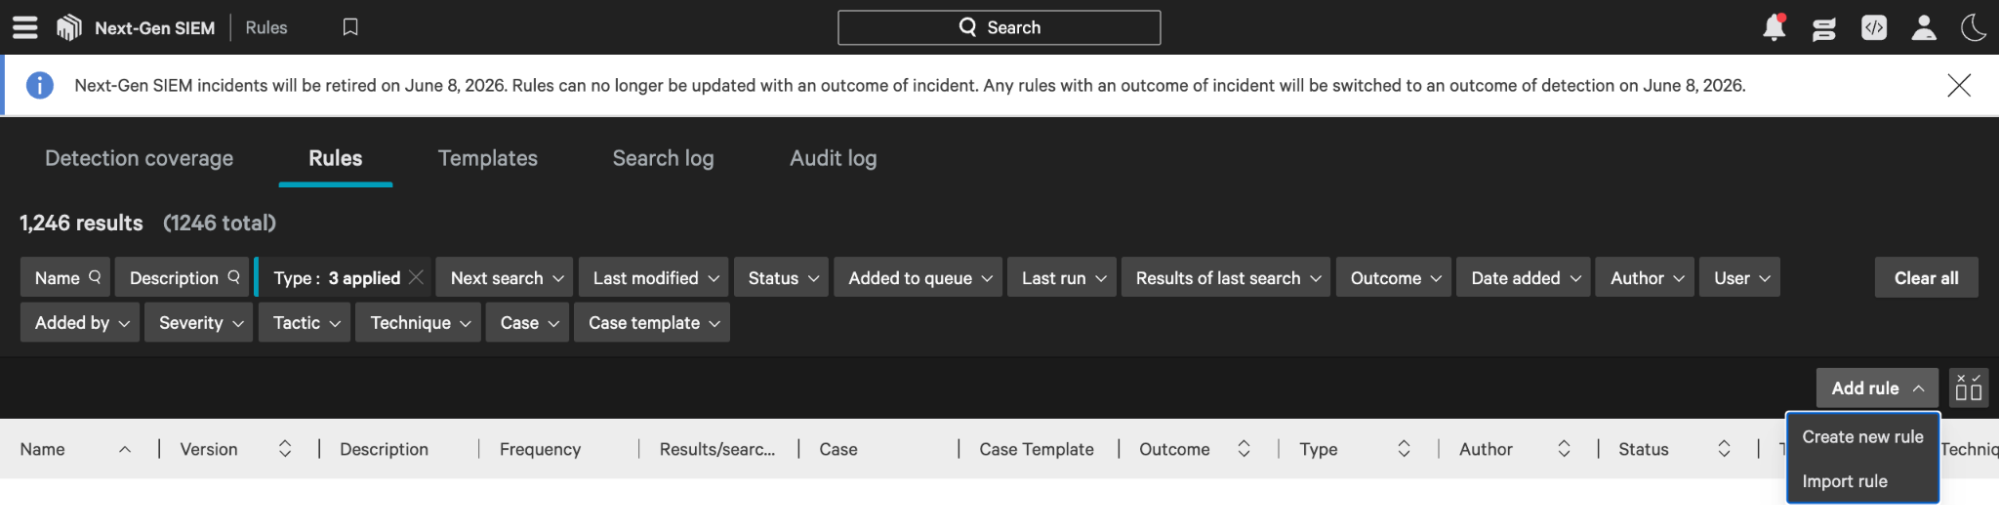
- Click on Add rule → Create new rule.
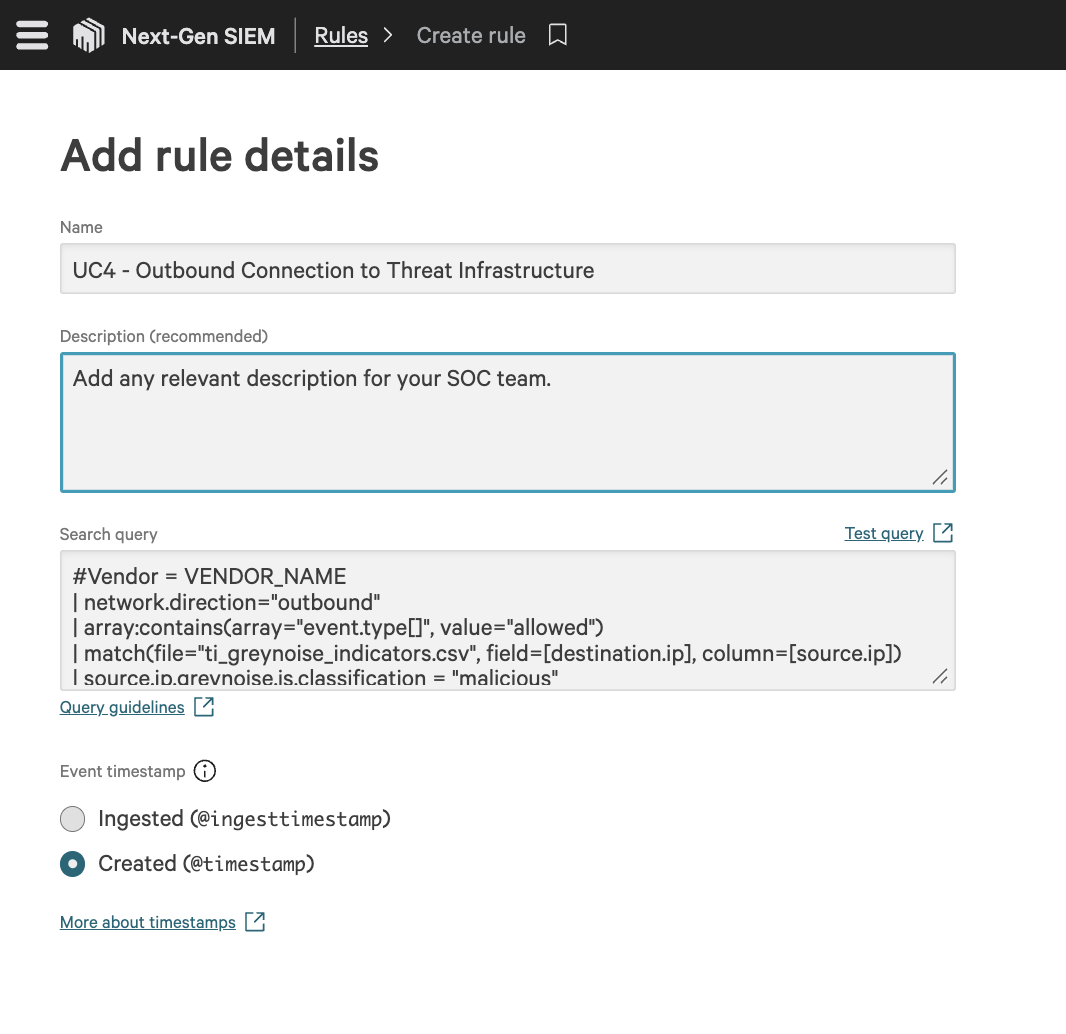
- Set the following details:
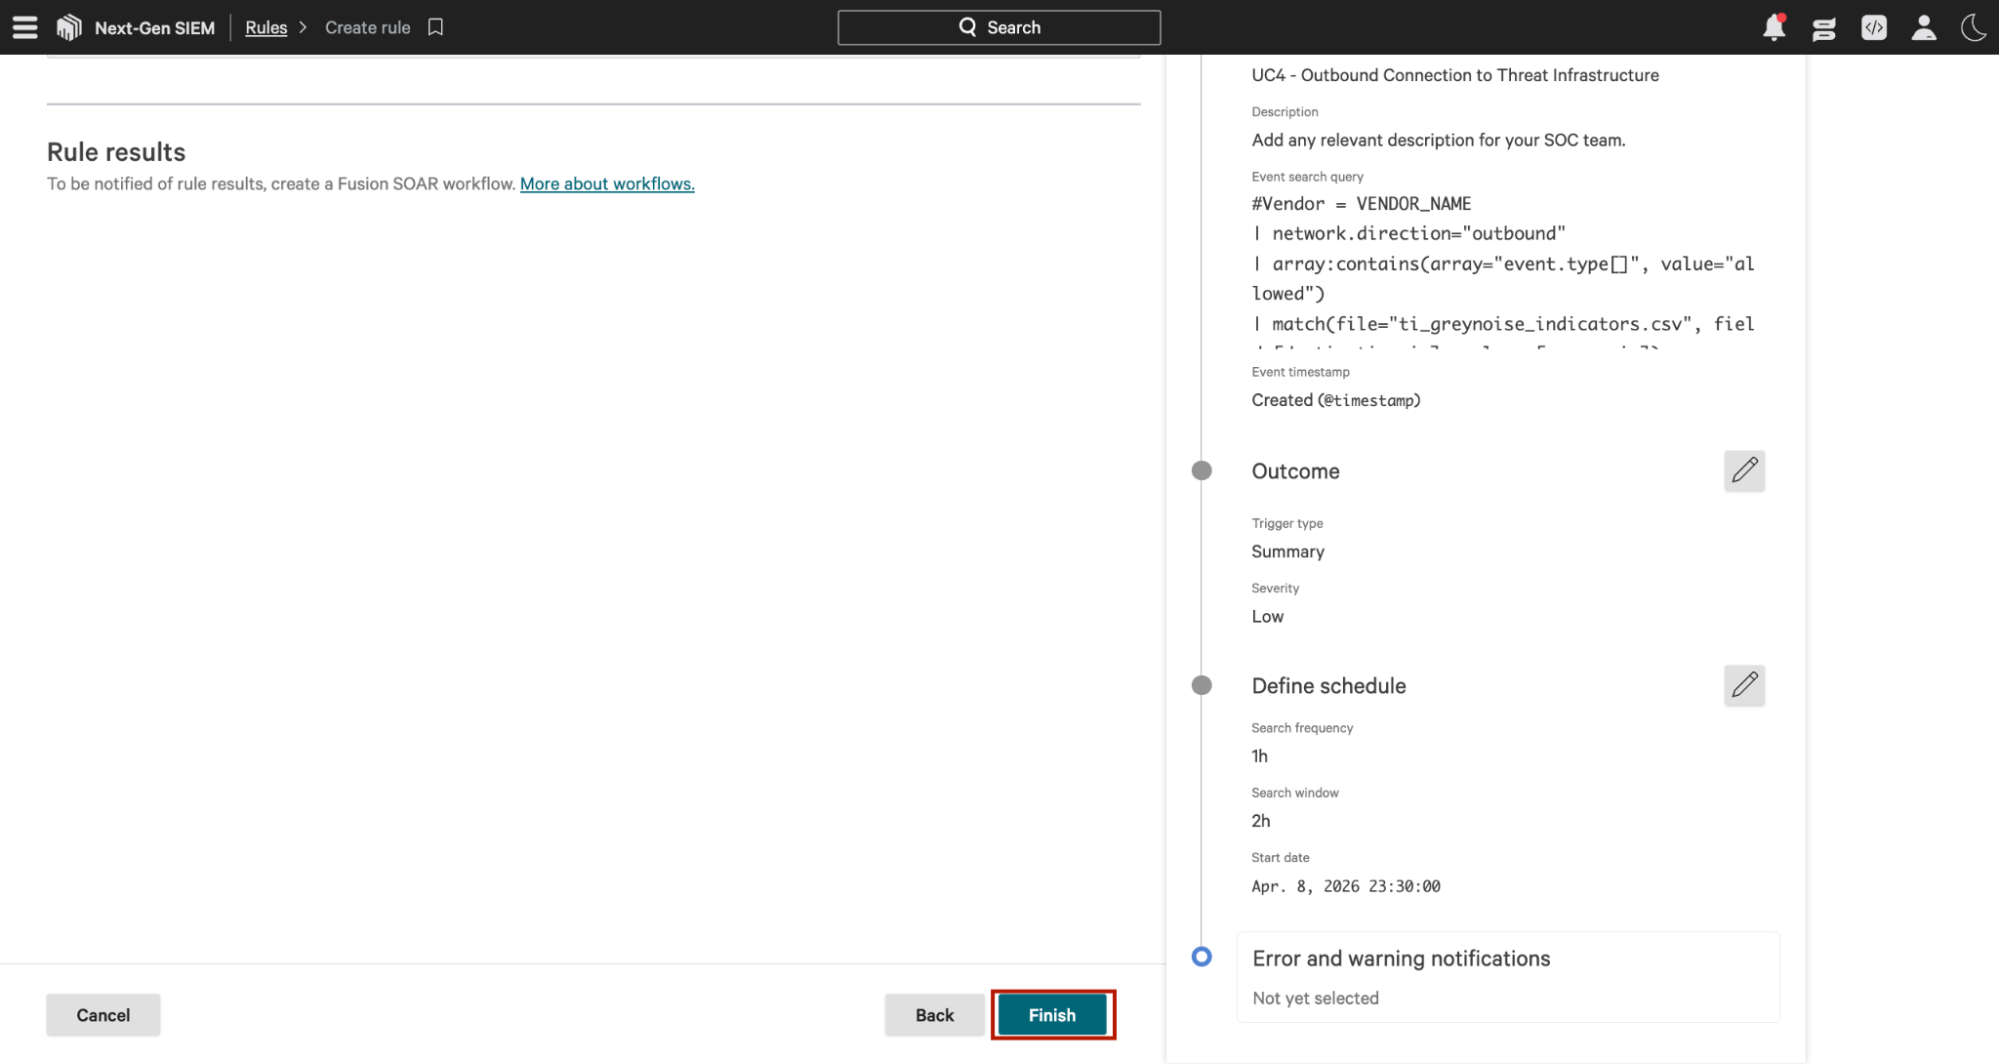
- Name: UC4 - Outbound Connection to Threat Infrastructure
- Description: Add any relevant description for your SOC team.
- Search query: Insert the full detection query mentioned in Step 3 above after updating your vendor name in it.
- Set the following details:
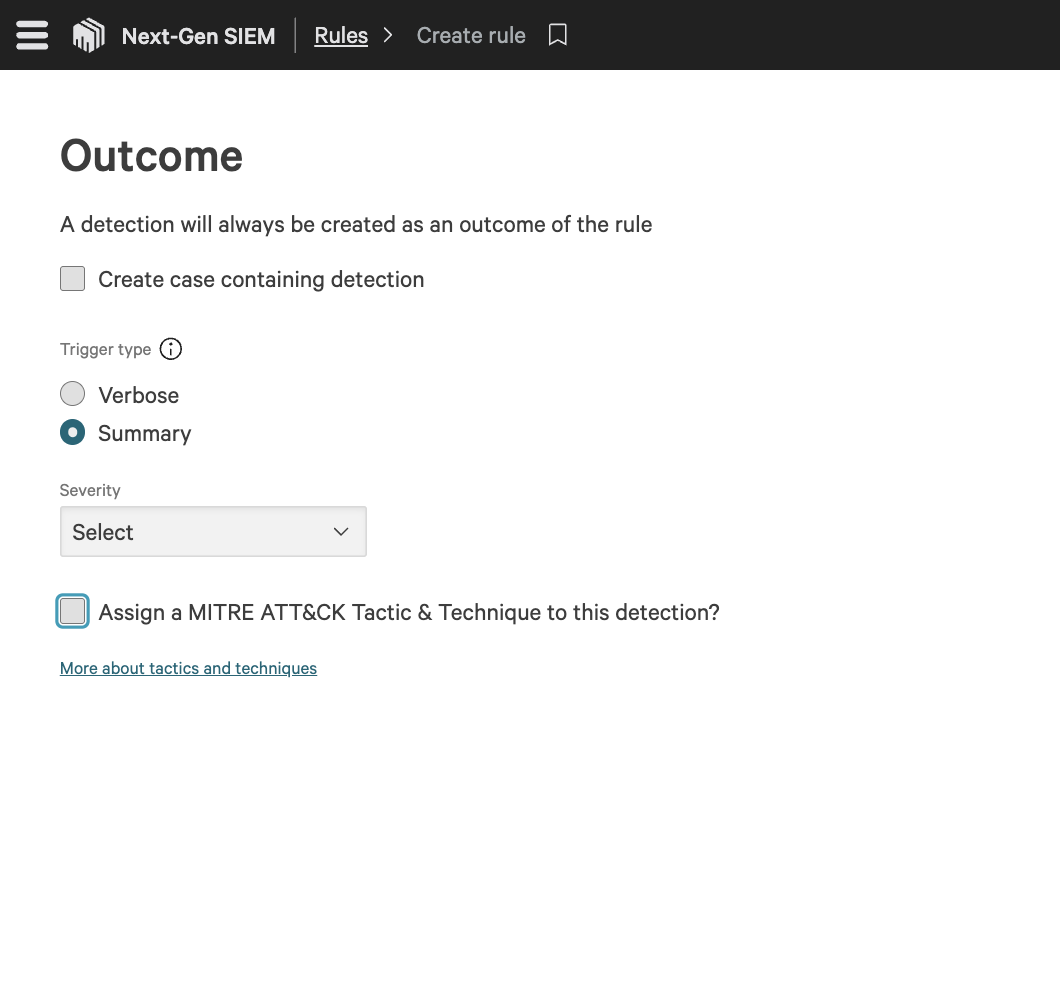
- Create case containing detection: If you want to generate a case containing detection, select the checkbox and case template. (A detection will always be created as an outcome of the rule.)
Recommendation: Enable this for high-confidence detections that require immediate investigation. For noisy or informational detections, keep it disabled to avoid unnecessary case creation. - Trigger type:
- Verbose: One outcome is generated for each result matching the query. The total number of outcomes is limited per rule trigger.
- Summary: One outcome is generated for all results matching the query. The total results included in the outcome are limited by the rule trigger.
- Recommendation: Use Verbose for low-volume, high-severity detections where each event matters. Use Summary for high-volume scenarios to reduce alert noise.
- Severity: Select the appropriate severity level for this detection. (Informational, Low, Medium, High, Critical).
Recommendation: Align severity with risk and impact—use High/Critical for confirmed or high-confidence threats, and Medium/Low for suspicious or baseline activity. - MITRE ATT&CK Tactic & Technique: Select the checkbox and assign MITRE ATT&CK Tactic & Technique.
Recommendation: Always map to MITRE when possible to improve detection context, reporting, and threat correlation.
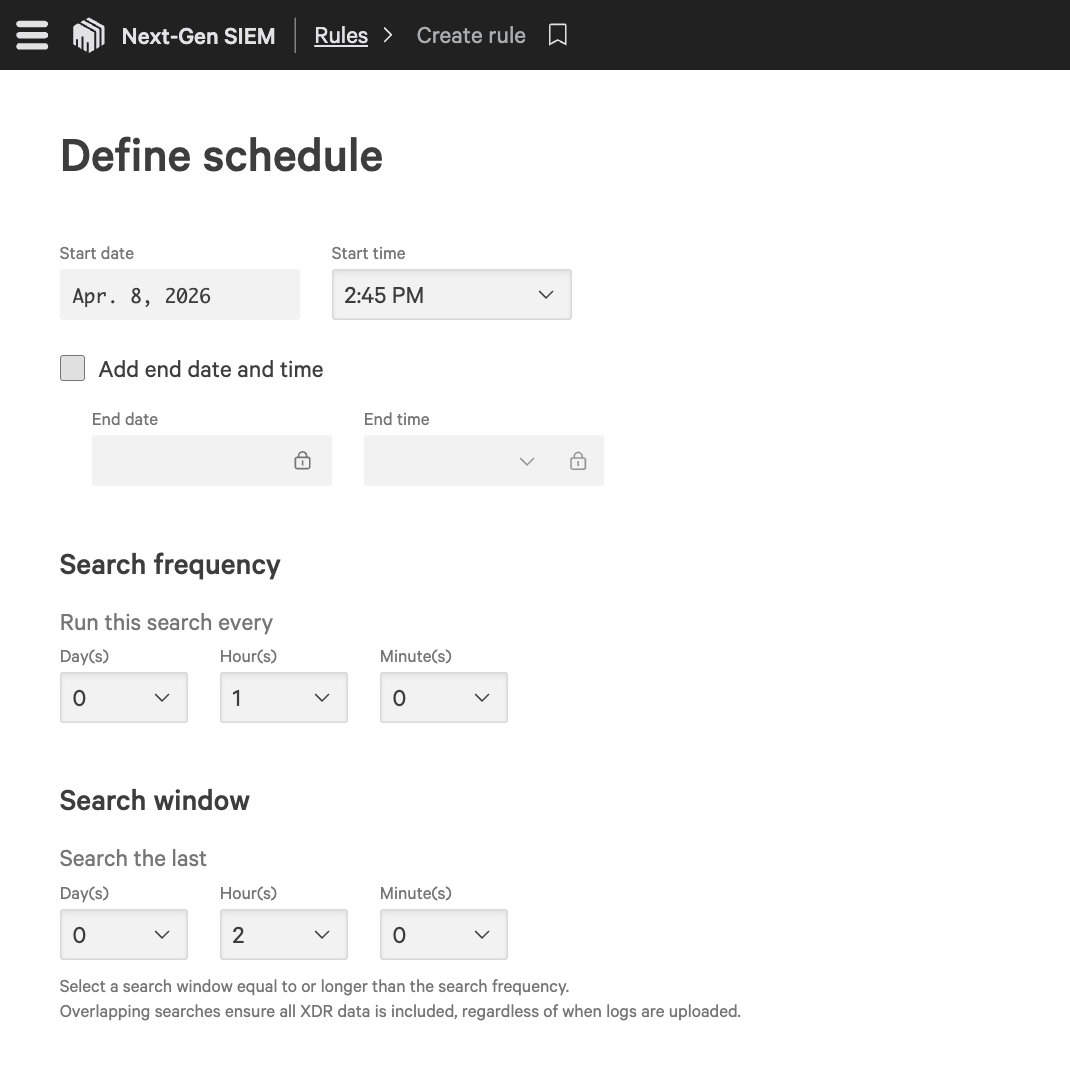
- Select Start date and Start time, Search frequency, Search window, and Search offset based on your monitoring requirements.
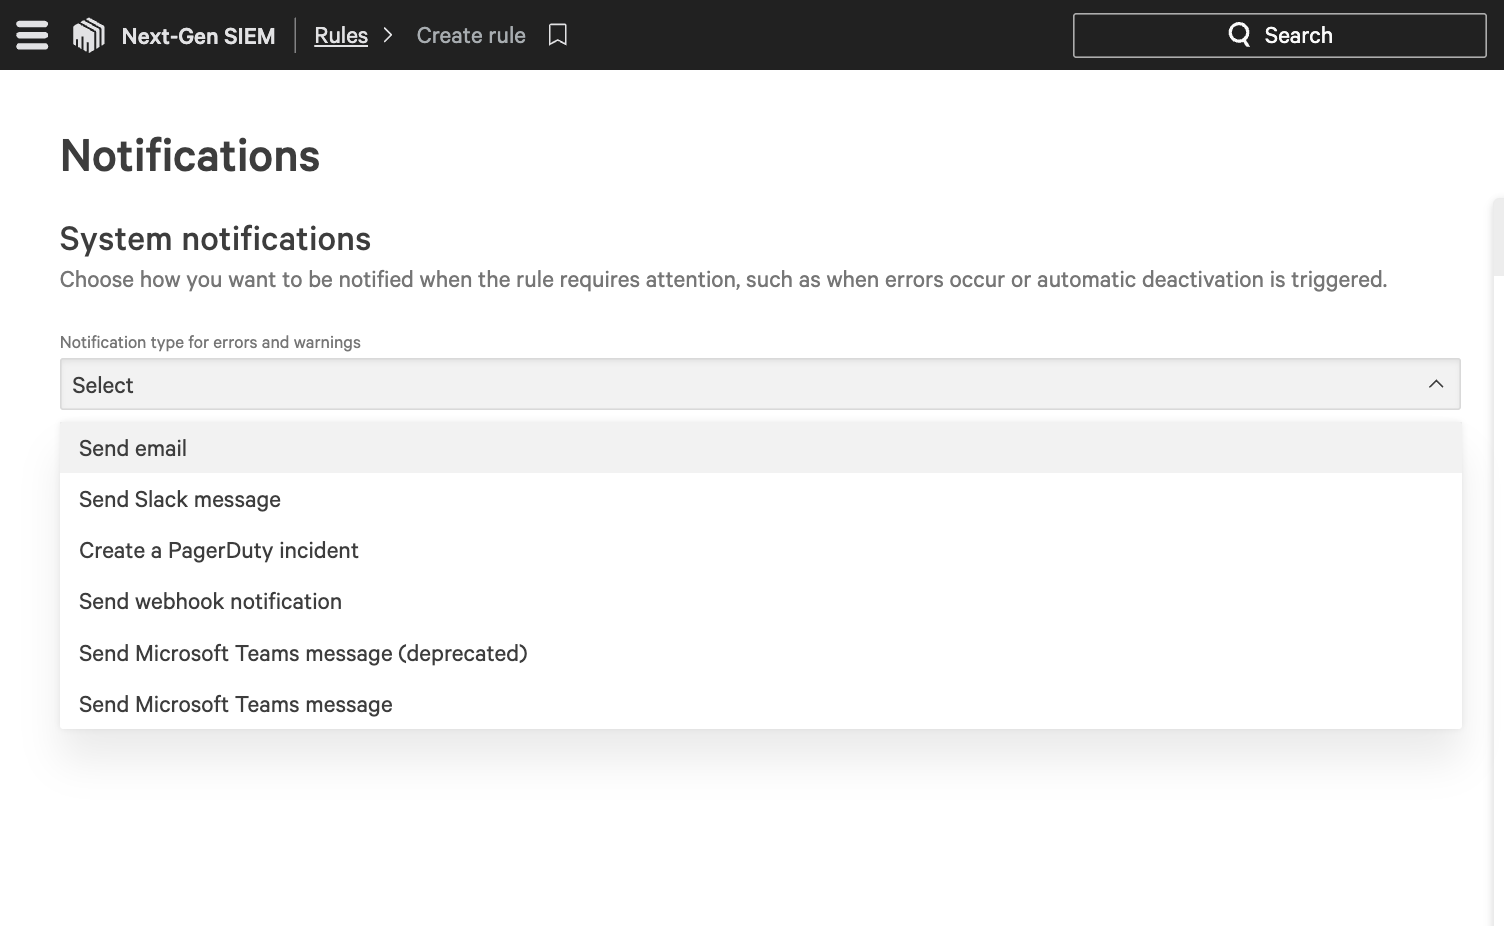
- Select the Notification Medium and, based on it, provide the requested values.
- Click on Finish to create the Correlation rule.
Note: You can change the Schedule Frequency and Time Range duration as per your needs.
Understanding the Output
The CQL query enriches every outbound destination IP through the GreyNoise lookup file, then applies progressive filters as follows:
-
Targets only outbound allowed connections.
-
Passes all destination IPs through GreyNoise enrichment via lookup file source.ip="dest_ip".
-
Keeps only destination IPs GreyNoise classifies as malicious.
-
Aggregates by internal source IP, capturing all threat destinations contacted and total connection count.
-
Retains only internal hosts with 3 or more connections to threat infrastructure, eliminating one-off accidental hits.
-
Sorts by connection count descending, most active beaconing or exfiltration candidates surface first.
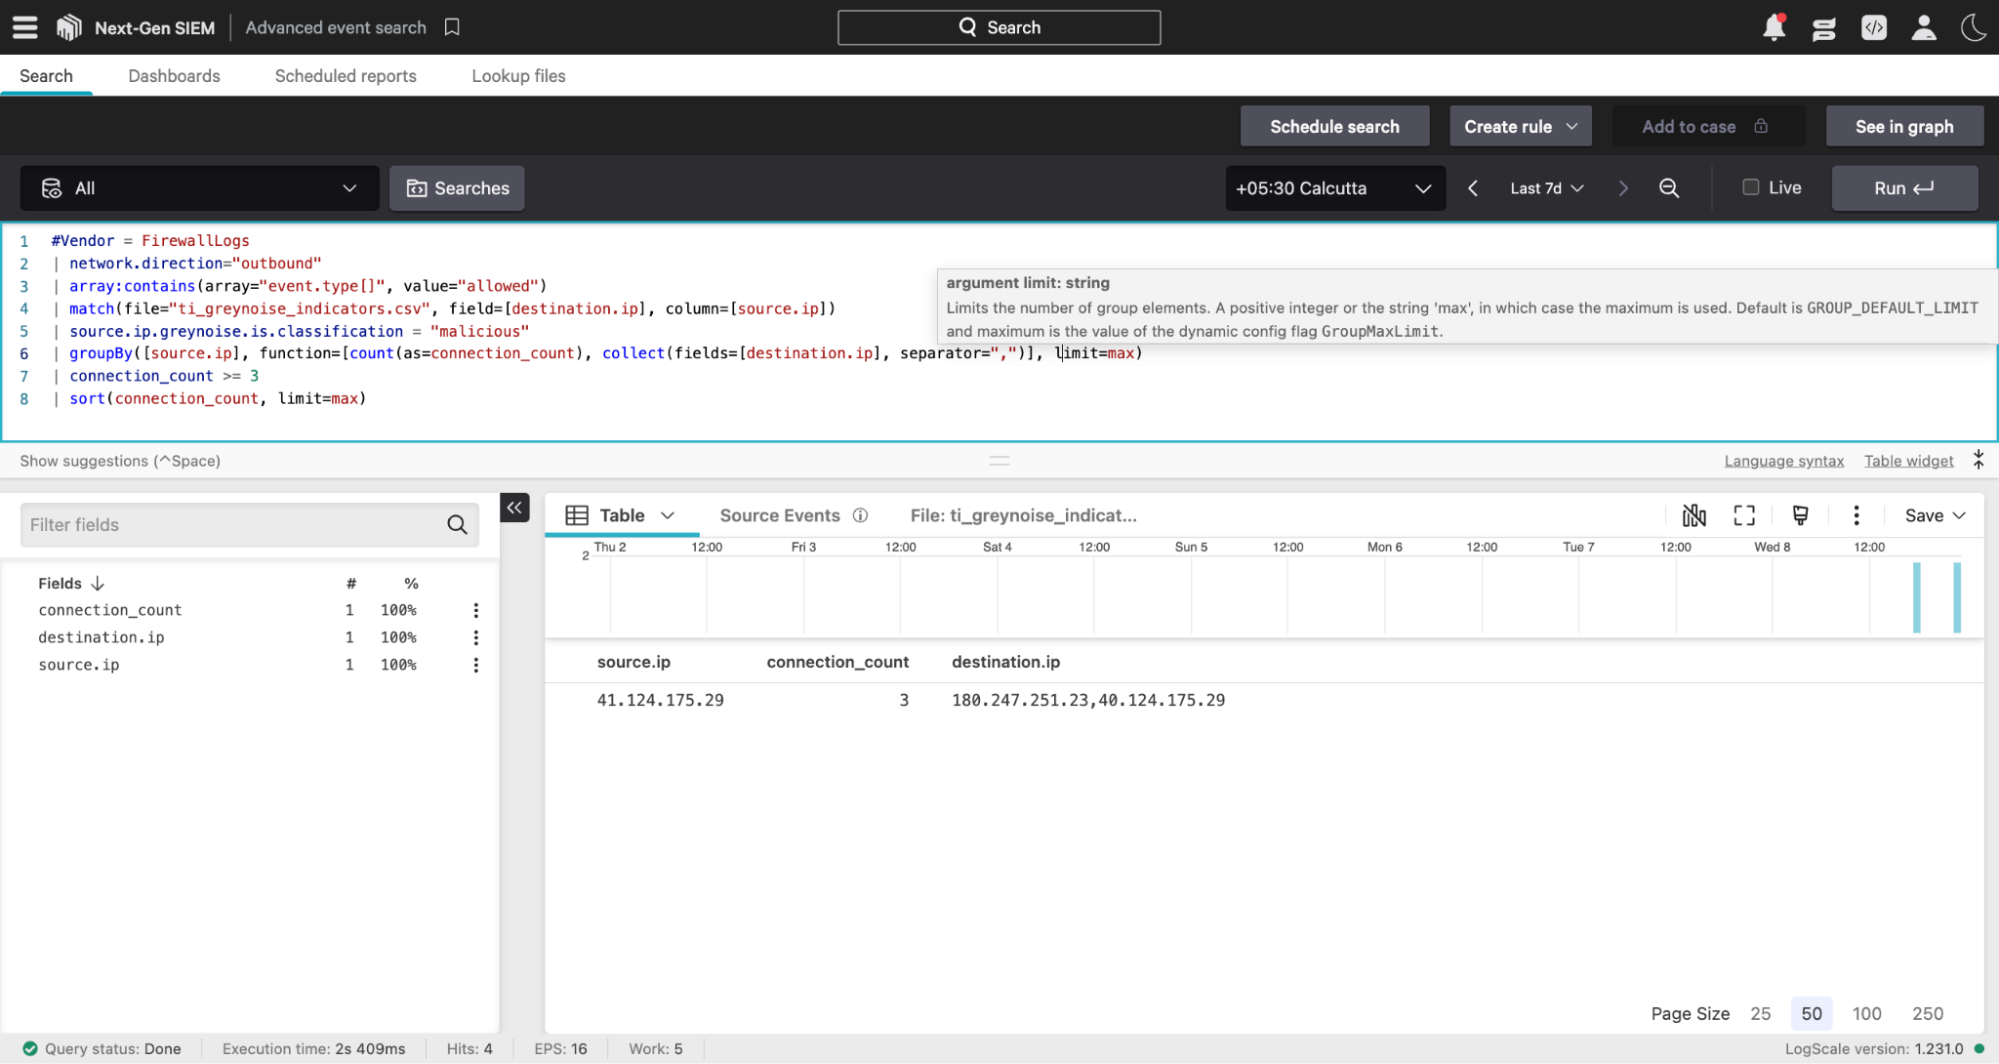
Result: Out of 38 raw outbound events, only 1 internal host (41.124.175.29) survived all filters, making 3 connections to 2 confirmed malicious destination IPs (180.247.251.23 and 40.124.175.29).
Query Output:
Results and Impact
Before vs After GreyNoise
| Before GreyNoise | After GreyNoise |
|---|---|
| 38 raw outbound events | 1 internal host with 3 confirmed malicious connections |
| None, just destination IPs with no threat context | Destinations classified as malicious inline |
| An analyst must manually investigate every outbound connection | Single host pre-identified with confirmed threat destinations |
| High, outbound traffic includes legitimate services and updates | Low, only confirmed malicious destinations retained |
| Minutes to hours, depending on analyst workload | Immediate, one result, pre-ranked and pre-validated |
| Limited to what the analyst manually checks | All outbound events are enriched automatically in a single pass |
Benefits for the SOC Team
- Flips the perspective - instead of watching what comes in, this use case watches what your internal hosts are reaching out to, catching compromised hosts that may have already bypassed perimeter controls.
- Immediate compromise indicator - an internal host repeatedly connecting to confirmed malicious IPs is one of the strongest signals of active infection or C2 activity.
- Multi-destination visibility -
collect(fields=[destination.ip], separator=",")exposes all malicious IPs contacted by the same internal host in a single row, revealing the full scope of outbound threat communication at a glance. - Reduces noise significantly - 38 raw events reduced to a single internal host worth investigating.
- Pivot-ready -
source.ipidentifies the exact internal host to isolate, and thedestination.ipprovides the malicious destinations to block at the perimeter.
Conclusion
Outbound connections to malicious infrastructure are one of the clearest post-compromise signals available - but only if you have the intelligence to recognize the destination. Standard egress monitoring cannot make that determination from raw logs alone.
GreyNoise not only adds intelligence to your alerts but also eliminates those that are not worthy of investigation in the first place. By incorporating GreyNoise Threat Intel CrowdStrike Next-Gen SIEM integration within your existing CrowdStrike environment, your SOC team goes from looking at 35 raw outbound events without context to a single internal host making repeated confirmed connections to malicious infrastructure - the clearest possible signal of an active compromise.
Updated about 23 hours ago