
CrowdStrike Next-Gen SIEM Use Case Guide 3
Flag Authentication Attempts from Compromised Hosts
Flag Authentication Attempts from Compromised Hosts
Overview
Every organization's VPN and identity provider receives thousands of authentication attempts daily - the vast majority of which are automated credential stuffing, brute-force, and password spray attacks. Standard detection logic treats all of these uniformly: a failed login generates a low-priority alert, and a successful login is trusted and passed through.
This approach has a critical blind spot.
Some of these attempts originate from IPs that GreyNoise has confirmed are actively conducting mass scanning operations, running botnet infrastructure, or operating known command-and-control (C2) servers. When one of those IPs successfully authenticates to your Okta environment or Active Directory, it is not a routine login event - it is an immediate indicator of compromise, regardless of whether the credentials were technically valid.
The GreyNoise Solution
Apply GreyNoise lookup matching in Next-Gen SIEM identity searches to evaluate every authentication (intrusion_detection) event, successful and failed, against a continuously refreshed threat context. Successful logins originating from GreyNoise malicious infrastructure are immediately escalated (P1). Repeated attempts from the same class of IPs are a strong indicator that your organization is being specifically targeted.
Prerequisites
Ensure your environment meets these prerequisites before beginning the setup:
Tools and Access
| Prerequisites | Details |
|---|---|
| CrowdStrike Falcon | Falcon Next-Gen SIEM or Falcon Insight XDR |
| GreyNoise App | GreyNoise Threat Intel app for Foundry Templates |
| API Key | GreyNoise API key configured in the app under Configuration |
| Firewall Logs | Palo Alto or equivalent VPN logs ingested in the Next-Gen SIEM |
| Log Fields (ECS mapped) | source.ip, #event.category |
| ECS Mapping | Your firewall/VPN data is accurately mapped to the ECS schema before being ingested into Next-Gen SIEM. #event.category should be available. |
Implementation Steps
Step 1: Verify Raw Events and Field Extraction
Before building any detection logic, confirm both log sources are available and that the key fields are extracted correctly. Okta and Azure AD use different field names for the same concepts; you need to know what fields you are working with before joining them. Use ECS field normalization in the parser if the source naming differs.
Step 2: Enrich with GreyNoise
This is the stage where the GreyNoise app performs its processing. The query below looks up GreyNoise data for each unique src_ip and enriches it with contextual fields that describe the observed behavior of that IP on the internet.
Note: When executing the query, replace <VENDOR_NAME> with the appropriate vendor name and <category_value> with the appropriate category value set by your vendor in their CrowdStrike parser.
#Vendor = <VENDOR_NAME>
| array:contains(array="event.category[]", value="<category_value>")
| match(file="ti_greynoise_indicators.csv", field=[source.ip], column=[source.ip])
Example #event.category[]=authentication
#Vendor = <VENDOR_NAME>
| array:contains(array="event.category[]", value="authentication")
| match(file="ti_greynoise_indicators.csv", field=[source.ip], column=[source.ip])
Example for #event.category[]=intrusion_detection
#Vendor = <VENDOR_NAME>
| array:contains(array="event.category[]", value="intrusion_detection")
| match(file="ti_greynoise_indicators.csv", field=[source.ip], column=[source.ip])
Step 3: Apply Filters and Assign Severity
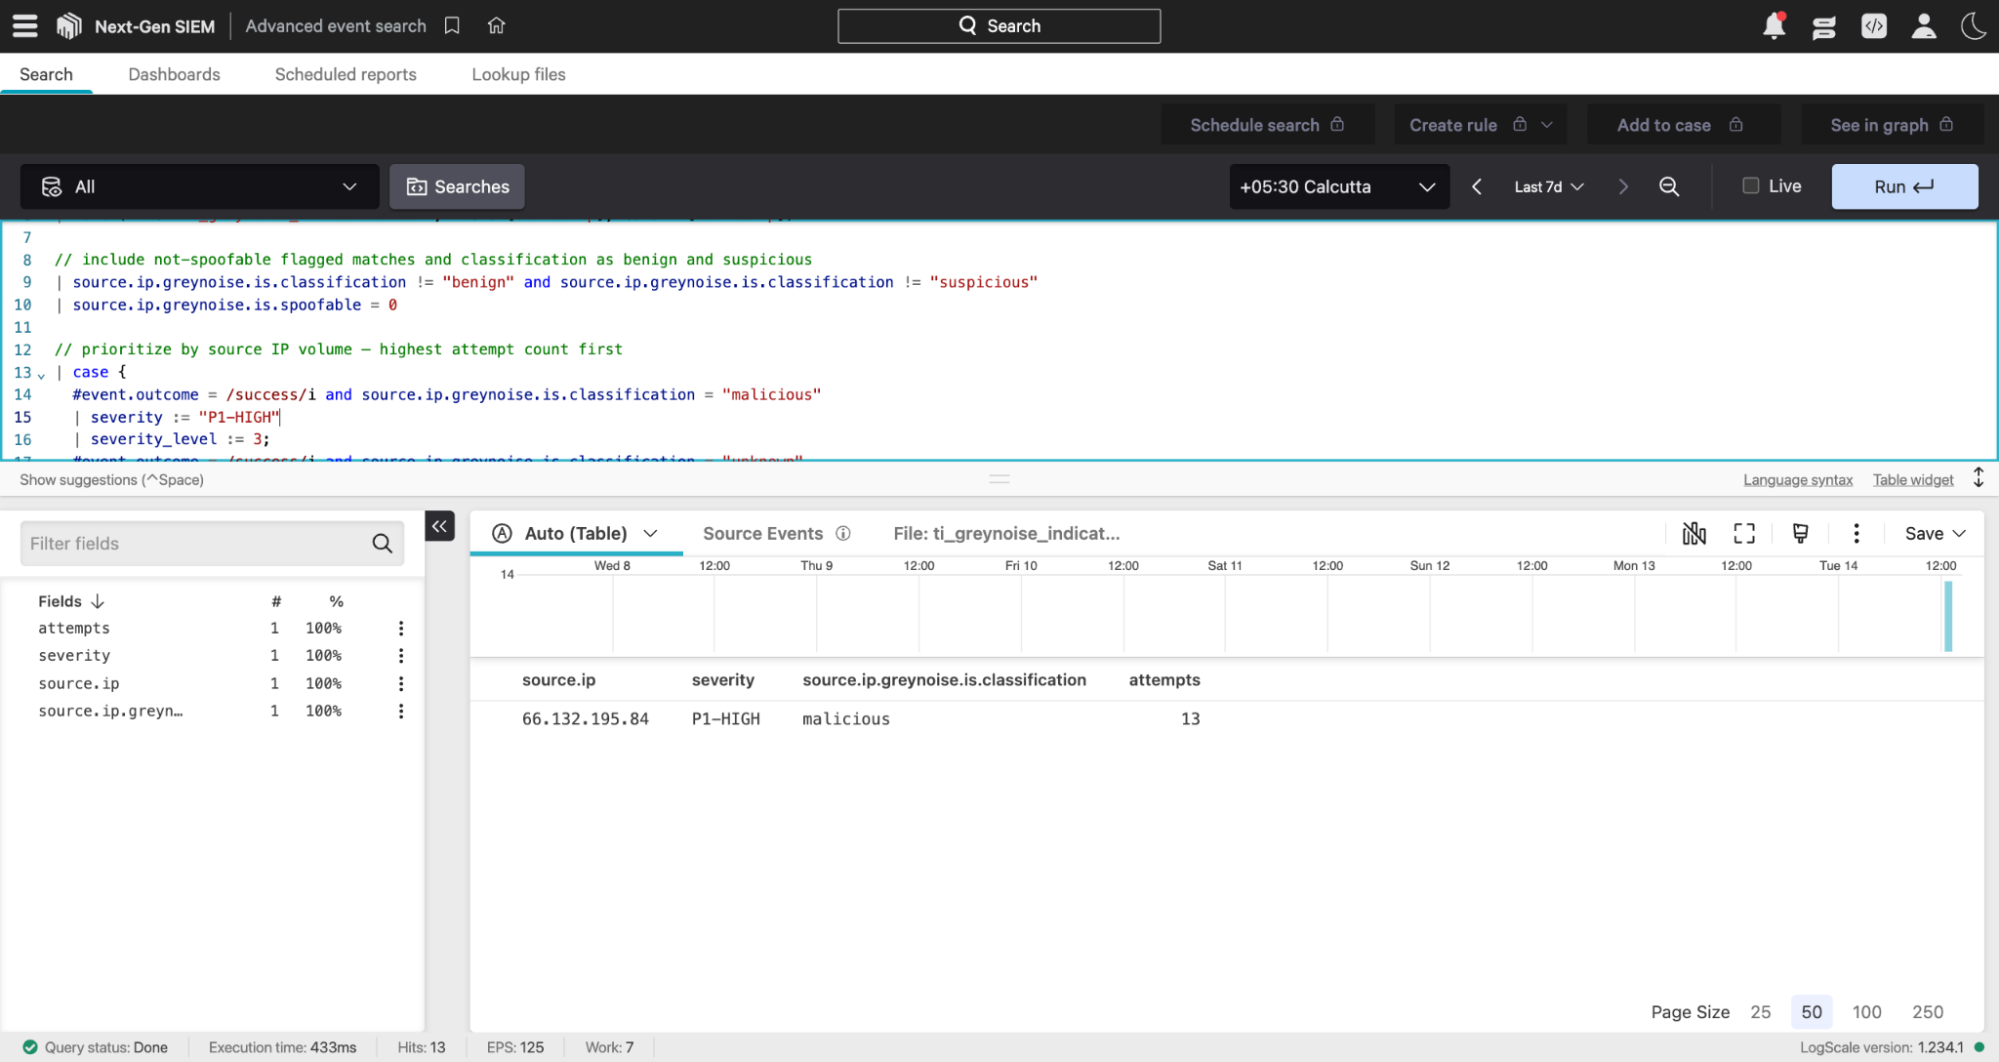
Apply progressive filters to retain only real, non-spoofable threat IPs prioritized by source IP volume — highest attempt count first. Then assign a severity level based on the event outcome and GreyNoise classification.
Note: Replace <VENDOR_NAME> with the name of your vendor and <category_value> with the appropriate category value set by your vendor in their CrowdStrike parser when you execute the query.
// FW/WAF logs
#Vendor = <VENDOR_NAME>
| array:contains(array="event.category[]", value="<category_value>")
// Filter local network IPs
| !cidr(source.ip, subnet=["0.0.0.0/32", "10.0.0.0/8", "172.16.0.0/12", "192.168.0.0/16"])
// match source IPs against GreyNoise
| match(file="ti_greynoise_indicators.csv", field=[source.ip], column=[source.ip])
// include not-spoofable flagged matches and classification as benign
| source.ip.greynoise.is.classification != "benign"
| source.ip.greynoise.is.spoofable = 0
// prioritize by source IP volume — highest attempt count first
| case {
  #event.outcome = /success/i and source.ip.greynoise.is.classification = "malicious"
  | severity := "P1-HIGH"
  | severity_level := 4;
  #event.outcome = /success/i and source.ip.greynoise.is.classification = "suspicious"
  | severity := "P2-HIGH"
  | severity_level := 3;
  #event.outcome = /failure/i and source.ip.greynoise.is.classification = "malicious"
  | severity := "P2-MEDIUM"
  | severity_level := 2;
  #event.outcome = /failure/i and source.ip.greynoise.is.classification = "suspicious"
  | severity := "P2-LOW"
  | severity_level := 1;
  *
  | severity := "P2-INFO"
  | severity_level := 0;
}
| groupBy([source.ip, severity, source.ip.greynoise.is.classification, severity_level], function=count(as=attempts), limit=max)
| sort(field=[severity_level, attempts], limit=max)
| drop([severity_level])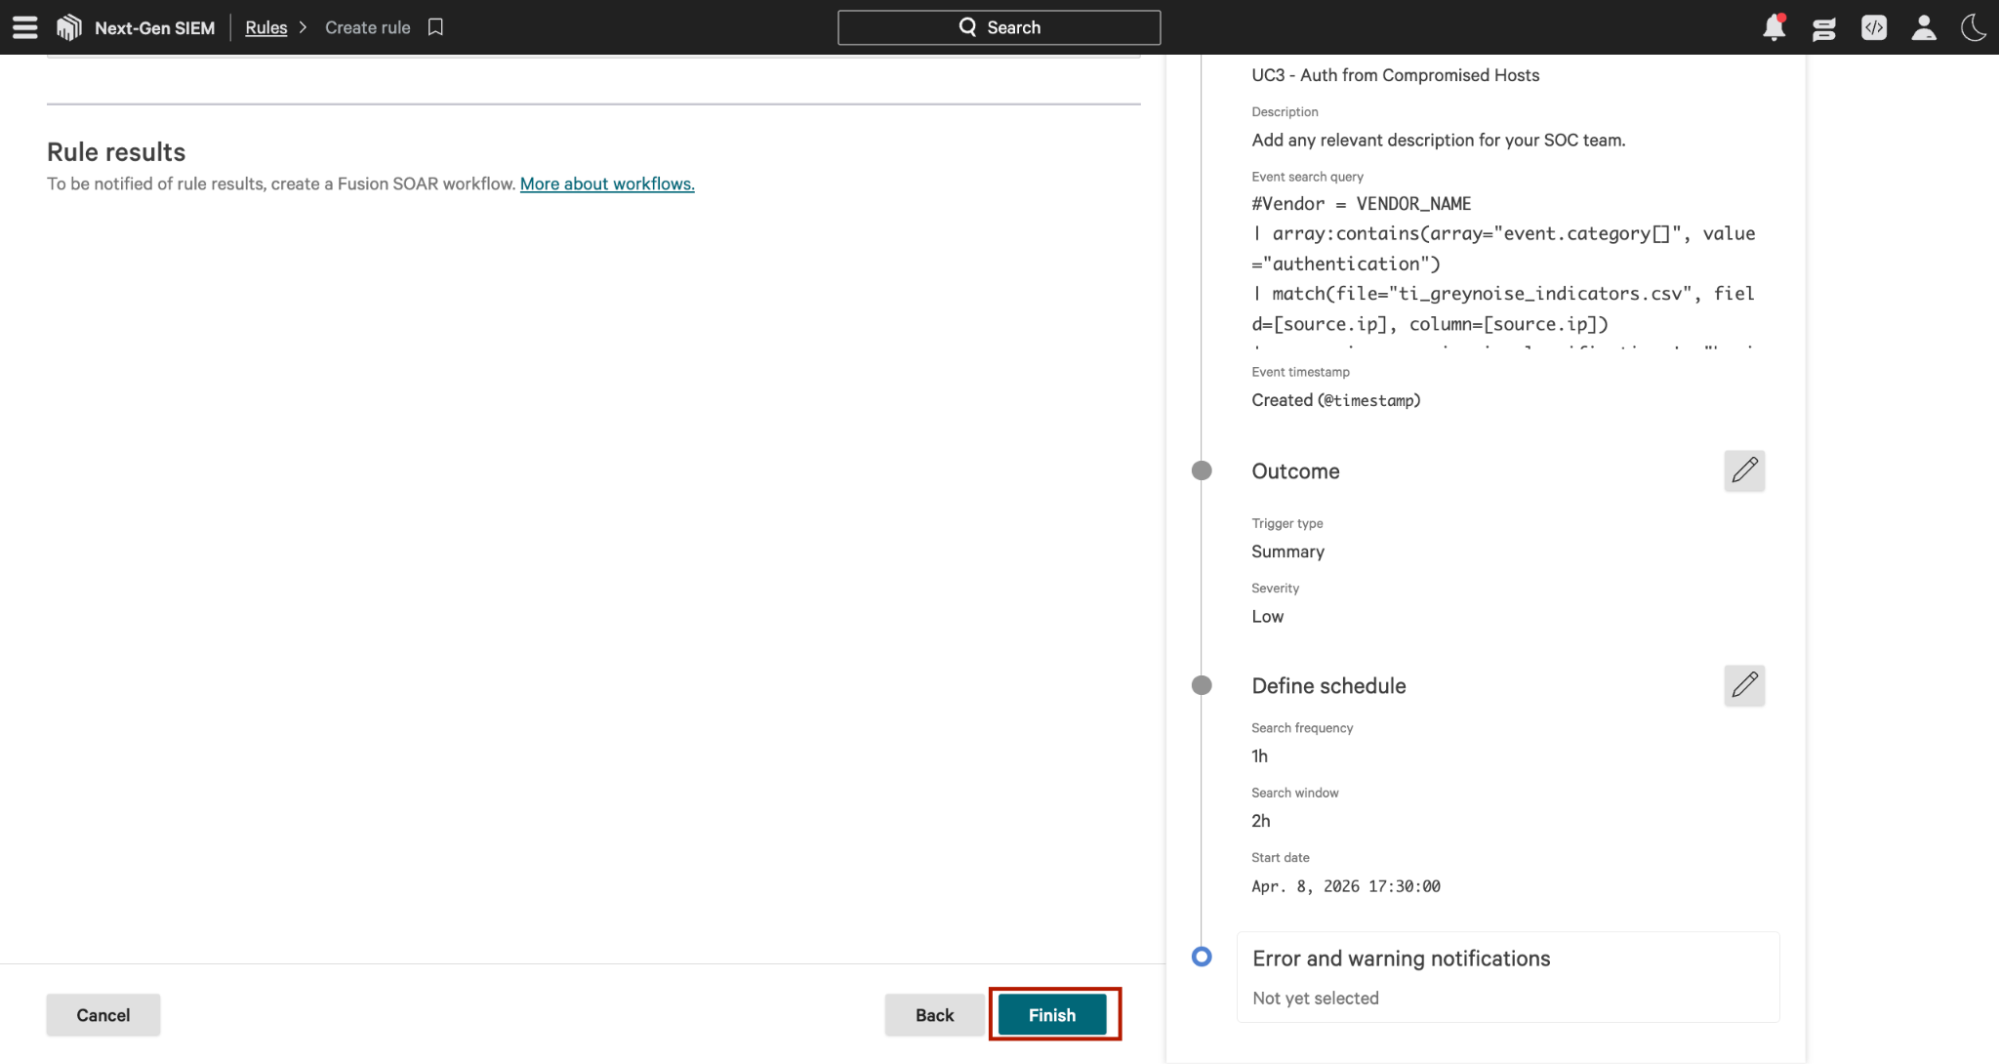
Not all flagged auth events carry the same risk. The severity assignment creates a clear triage order, so analysts know exactly what to work on first.
Severity reference:
| Severity | Condition |
|---|---|
| P1-HIGH | outcome=SUCCESS AND classification=malicious → Active account compromise from known threat infrastructure |
| P2-HIGH | outcome=SUCCESS AND classification=suspicious → Successful auth from IP, needs immediate review |
| P2-MEDIUM | outcome=FAILURE AND classification=malicious → Active targeting of your org, not yet successful |
| P2-LOW | outcome=FAILURE AND classification=suspicious → Targeting of your org, not yet successful |
| P3-INFO | All other IPs which are not classified by GreyNoise. |
Step 4: Save as a Correlation Rule
Once the search is verified end-to-end, save it as a Correlation rule to run automatically and generate a detection or a case:
Steps:
- Go to Next-Gen SIEM → Rules.
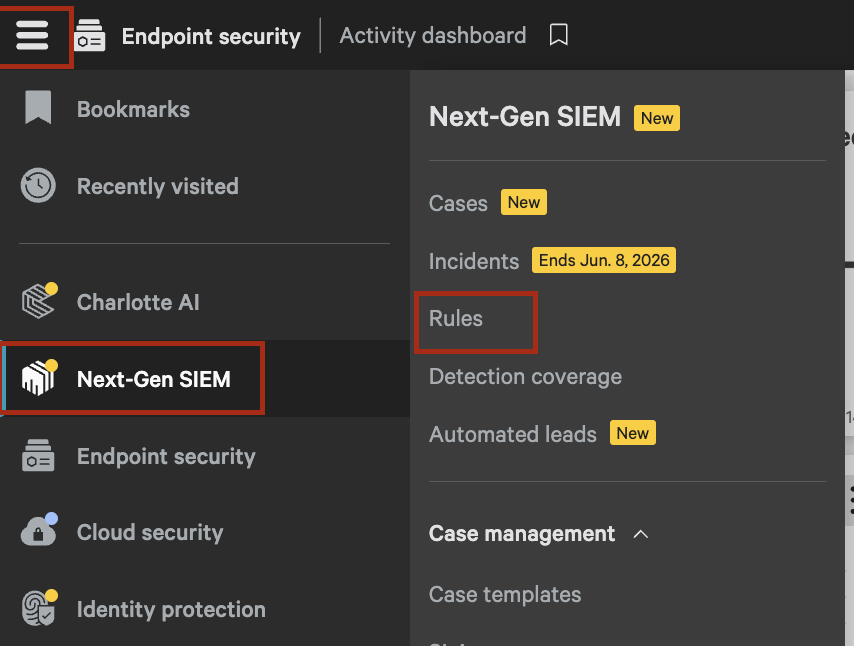
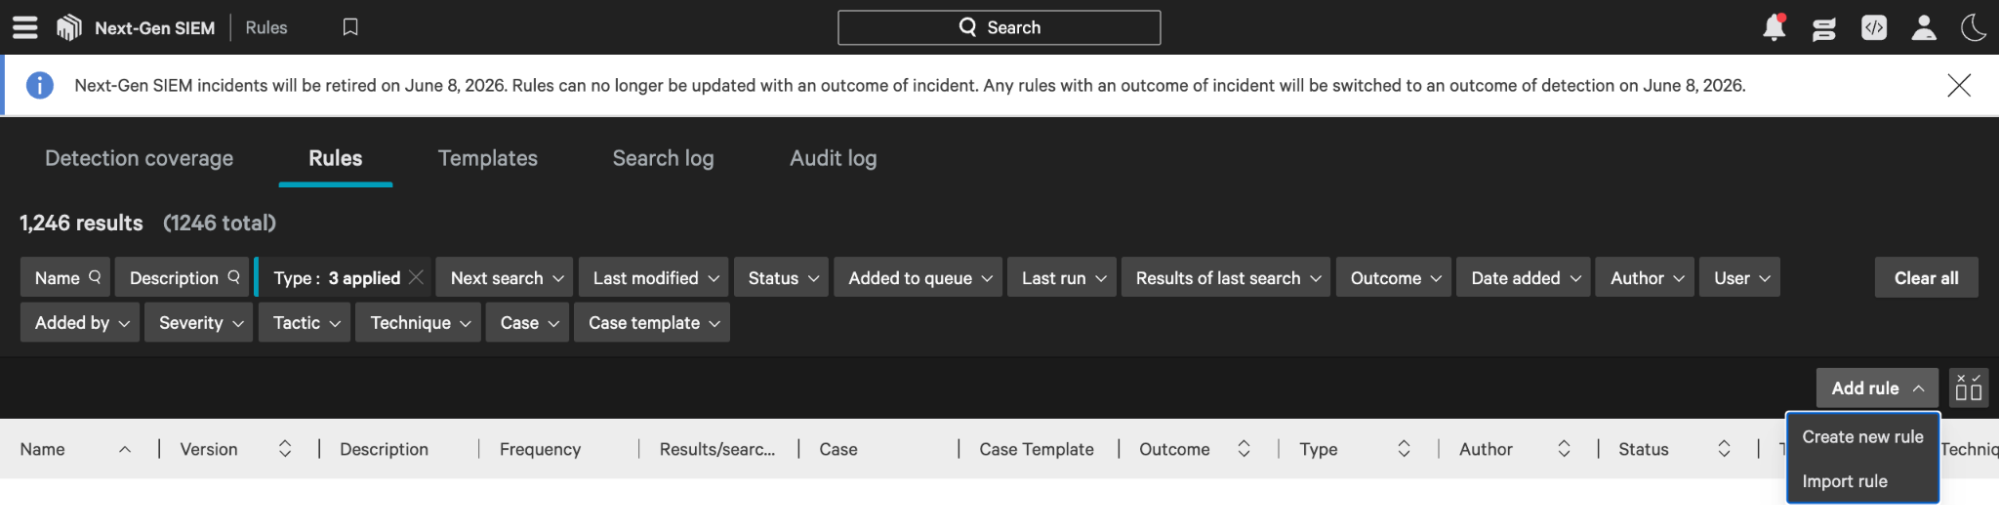
- Click on Add rule → Create new rule.
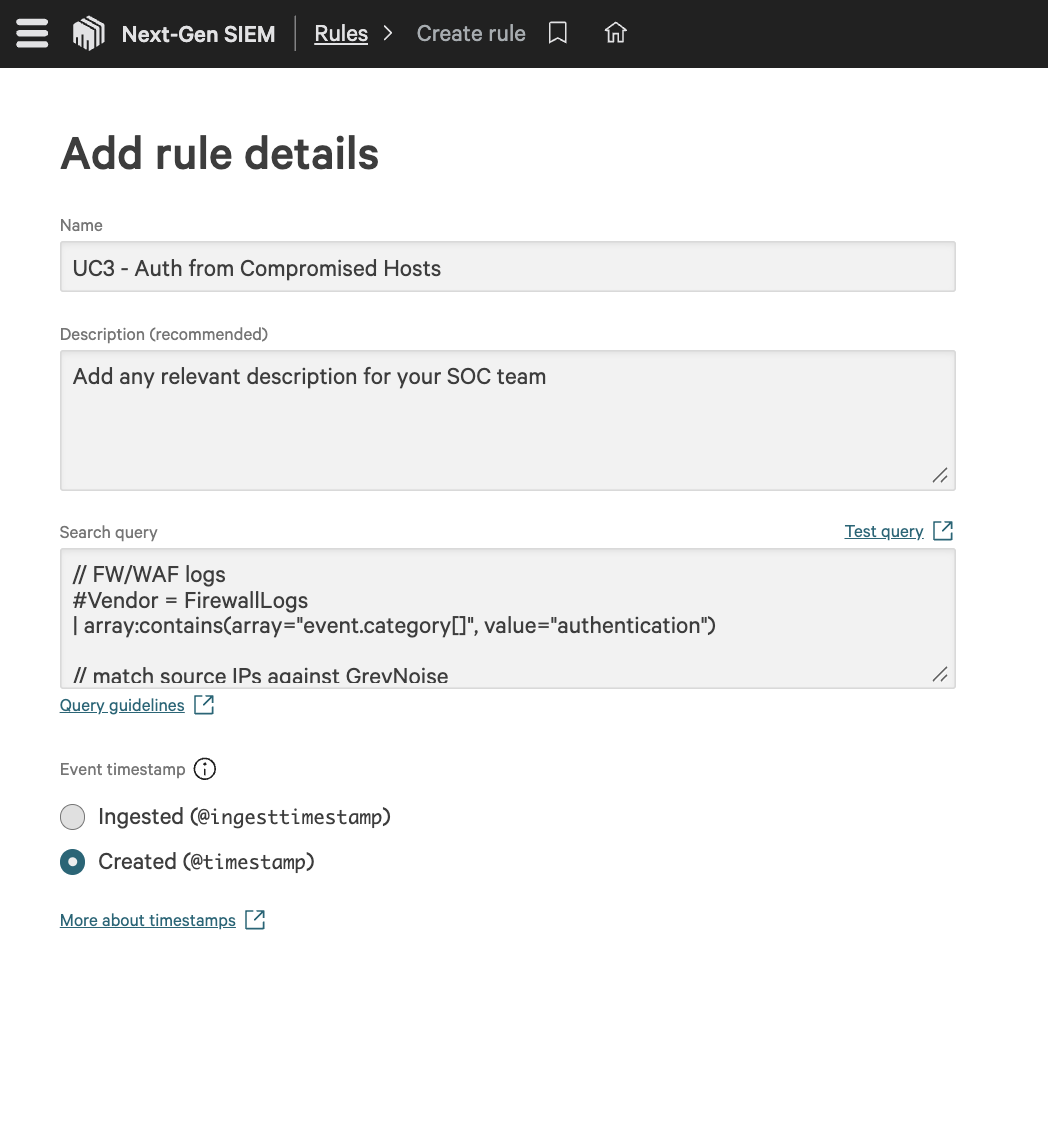
- Set the following details:
- Name: UC3 - Auth from Compromised Hosts
- Description: Add any relevant description for your SOC team.
- Search query: Insert the query mentioned in Step 3 above after updating your vendor name in it.
- Set the following details:
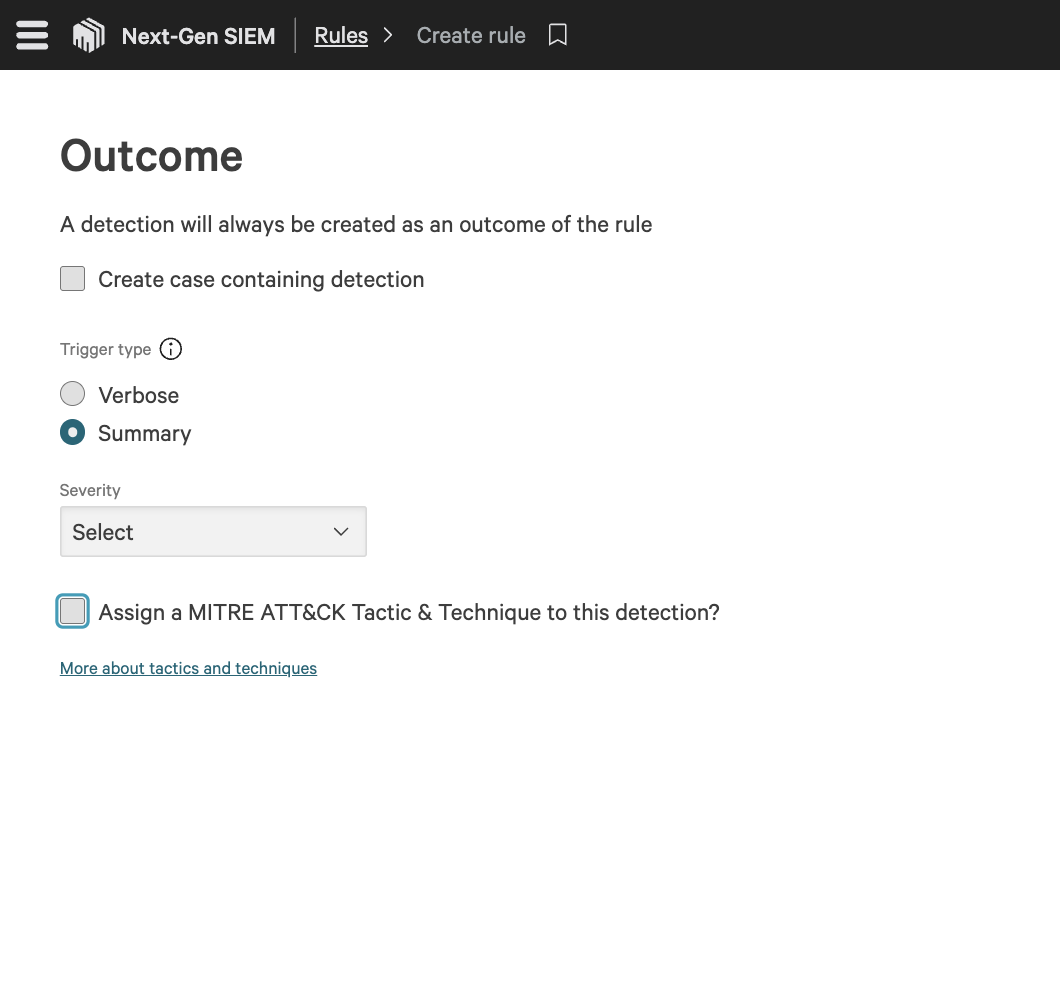
- Create case containing detection: If you want to generate a case containing detection, select the checkbox and case template. (A detection will always be created as an outcome of the rule.)
Recommendation: Enable this for high-confidence detections that require immediate investigation. For noisy or informational detections, keep it disabled to avoid unnecessary case creation. - Trigger type:
- Verbose: One outcome is generated for each result matching the query. The total number of outcomes is limited per rule trigger.
- Summary: One outcome is generated for all results matching the query. The total results included in the outcome are limited by the rule trigger.
- Recommendation: Use Verbose for low-volume, high-severity detections where each event matters. Use Summary for high-volume scenarios to reduce alert noise.
- Severity: Select the appropriate severity level for this detection. (Informational, Low, Medium, High, Critical).
Recommendation: Align severity with risk and impact—use High/Critical for confirmed or high-confidence threats, and Medium/Low for suspicious or baseline activity. - MITRE ATT&CK Tactic & Technique: Select the checkbox and assign MITRE ATT&CK Tactic & Technique.
Recommendation: Always map to MITRE when possible to improve detection context, reporting, and threat correlation.
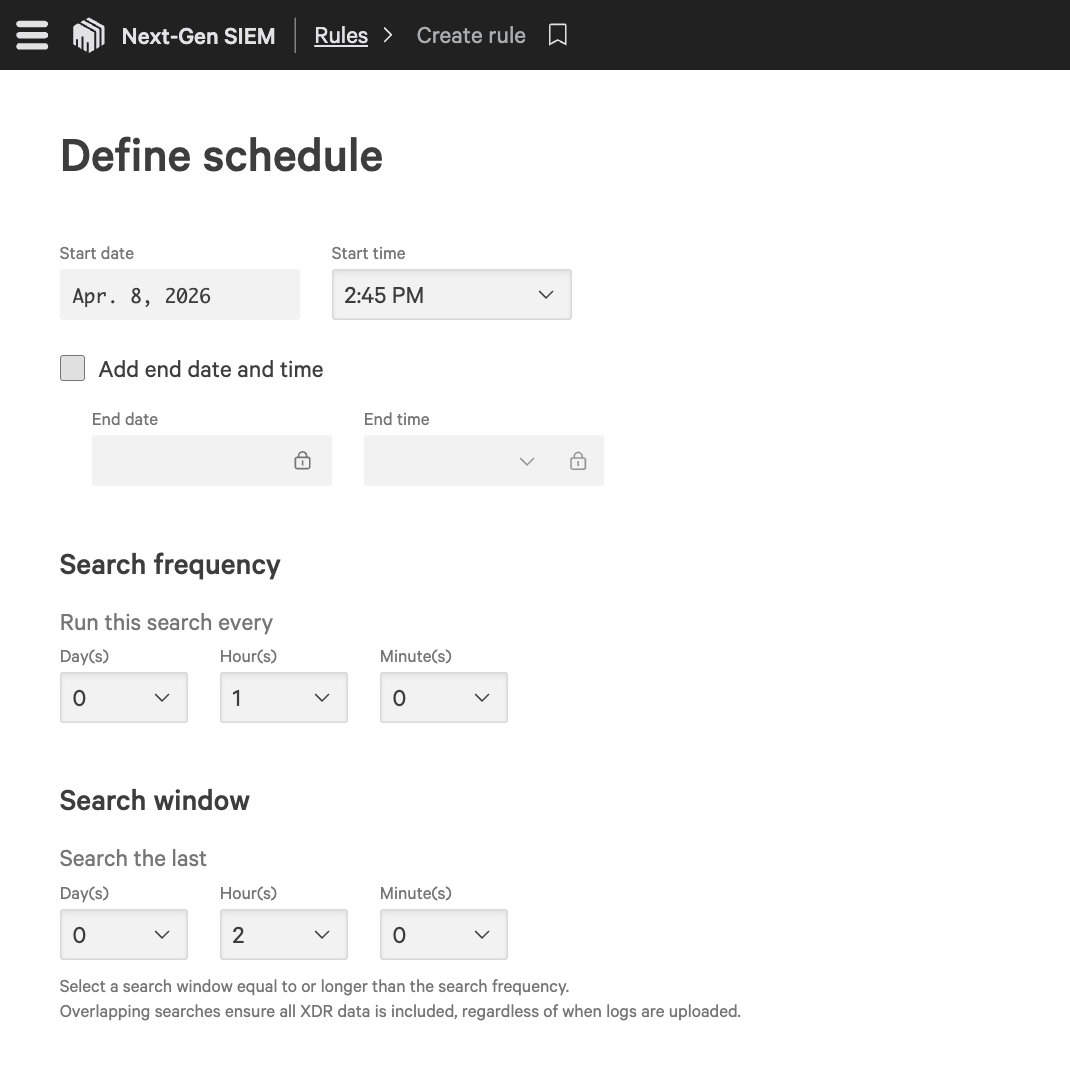
- Select Start date and Start time, Search frequency, Search window, and Search offset based on your monitoring requirements.
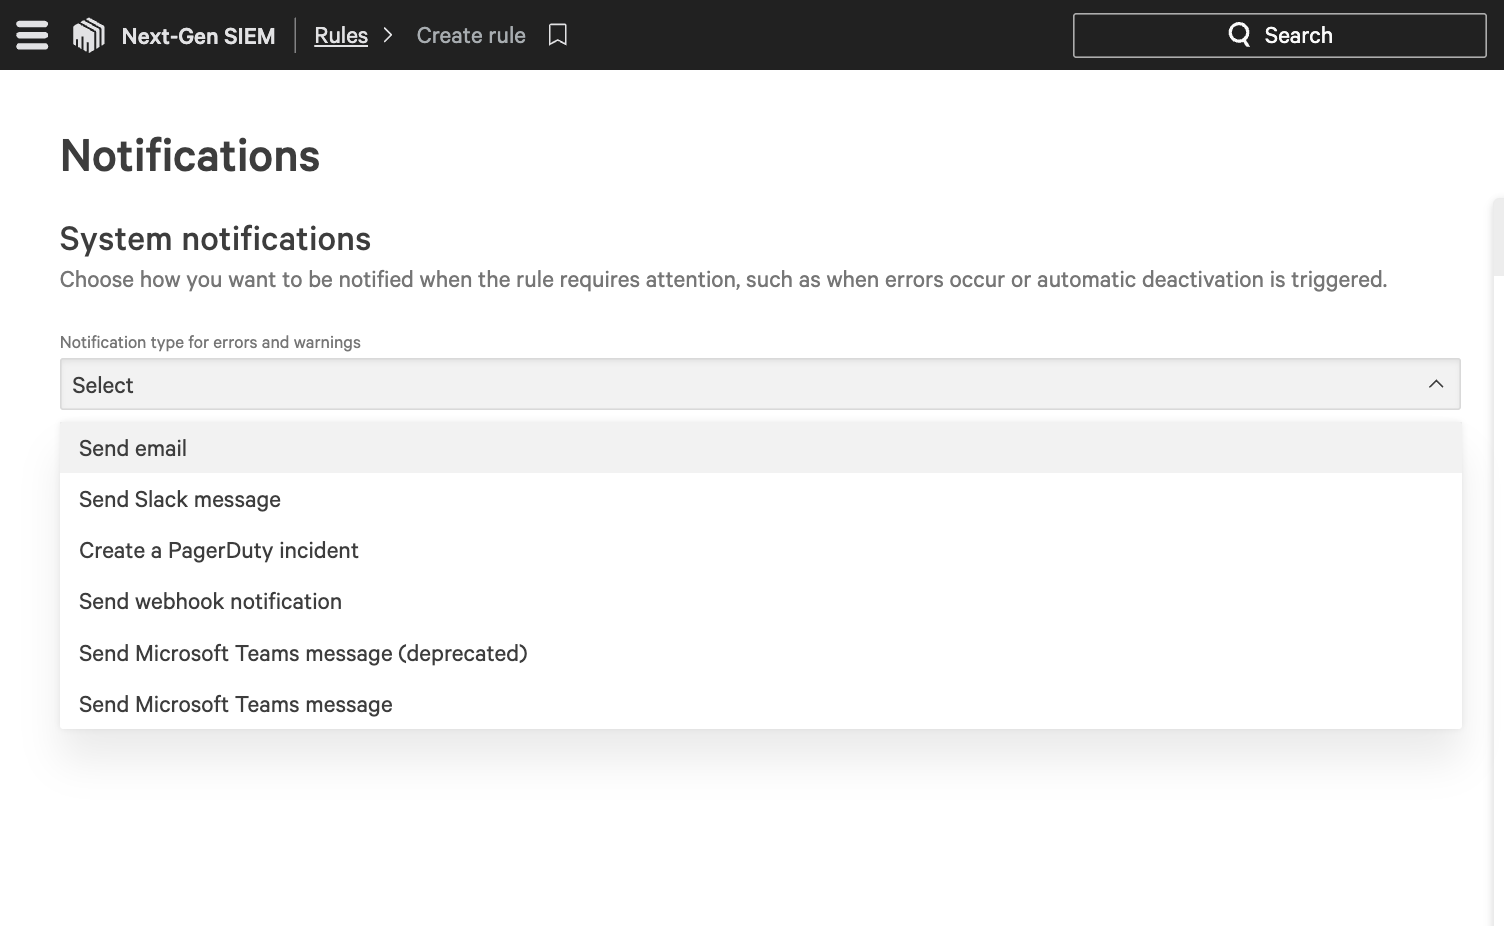
- Select the Notification Medium and, according to it, provide the desired value.
- Click on Finish to create the Correlation rule.
Note: You can change the Schedule Frequency and Time Range duration as per your needs.
Understanding the Output
Every result surfaced by this query carries a severity verdict. The table below defines what each verdict requires from the analyst:
| Severity | What It Means |
|---|---|
| P1-HIGH | A known malicious IP has successfully authenticated. Treat it as an active compromise. Immediately revoke the session, reset credentials, and isolate the endpoint. |
| P2-HIGH | A suspicious IP has successfully been authenticated. Investigate the account and session immediately. |
| P2-MEDIUM | A malicious IP is actively attempting to authenticate. Your organization is being specifically targeted. Review and consider blocking. |
| P2-LOW | A suspicious IP is actively attempting to authenticate (failed attempt). Monitor for patterns and consider blocking if repeated. |
| P3-INFO | No threat indicators matched, or unclassified activity. Log for correlation with other events. |
Benefits for the SOC Team
| Benefit | Detail |
|---|---|
| Distinguishes Targeted vs Opportunistic | Separates mass spray attacks from IPs specifically probing your organization's identity infrastructure. |
| Catches Compromises Standard Logs Miss | A successful login from a C2 IP looks normal in raw auth logs. GreyNoise context makes it immediately visible. |
| Works Across Okta and Azure AD | Single query handles both identity providers simultaneously using coalesce field normalization. |
| Clear Severity Triage | P1-CRITICAL, P1-HIGH, P2-MEDIUM verdicts tell analysts exactly what to work on first, no interpretation required. |
| Earlier Intervention | Failed auth attempts from flagged IPs are surfaced before a successful compromise occurs. |
Updated 2 days ago